Drawing Princess Jasmine is all about capturing her unique spirit. Before you even pick up a pencil, take a moment to really look at her design. Think about her confident posture, those incredibly expressive eyes, and her famous turquoise outfit. Getting these core elements in your head first is the secret to a drawing that feels alive.
Capturing Jasmine's Iconic Character
So, what makes Jasmine stand out? She's not your typical damsel in distress. Her design screams strength and determination, a deliberate choice by the animators. This personality is baked right into her look—from that incredibly thick, flowing hair to her distinct, almond-shaped eyes that can show everything from defiance to affection.
Her look wasn't an accident. Originally, Jasmine was imagined as a more spoiled, bratty character. Thankfully, Disney's artists re-envisioned her as the independent, fiery heroine we all love. That backstory is crucial to her appeal, and it's something you want to channel into your art. To get a better feel for this, you can find some great behind-the-scenes clips about the making of Disney's "Aladdin" on YouTube.
If you're looking to dive deeper into this, exploring some general character design and sketching tips can give you a fantastic foundation for any character you want to draw, not just Jasmine.
Your Drawing Roadmap
I'll walk you through a simple, step-by-step process so you can feel confident as you go. We'll begin with the basic shapes that form her body, then zoom in on her expressive face, and finally, tackle her signature hair and outfit.
This infographic gives a great overview of the journey we're about to take.

As you can see, a great drawing always starts with observation before you get into the technical bits. And once you're done sketching, why not practice your coloring? You can find plenty of inspiration over at our collection of free https://www.colortada.com/free-coloring-pages/disney-coloring-pages.
Building Your Sketch with Foundational Shapes
Every great drawing starts with a solid foundation. Don't worry about getting the details perfect right away. Our first job is to block out Princess Jasmine’s form using simple, basic shapes. Think of it like building a sculptor's armature or a mannequin—it gives you a solid structure to build upon.
Let's begin with her head. Sketch a simple circle, then draw a cross inside it: one vertical line straight down the middle and one horizontal line cutting across the center. This little map is the key to getting her iconic features in the right place. Her eyes will sit right on that horizontal line, while her nose and mouth will align with the vertical one.
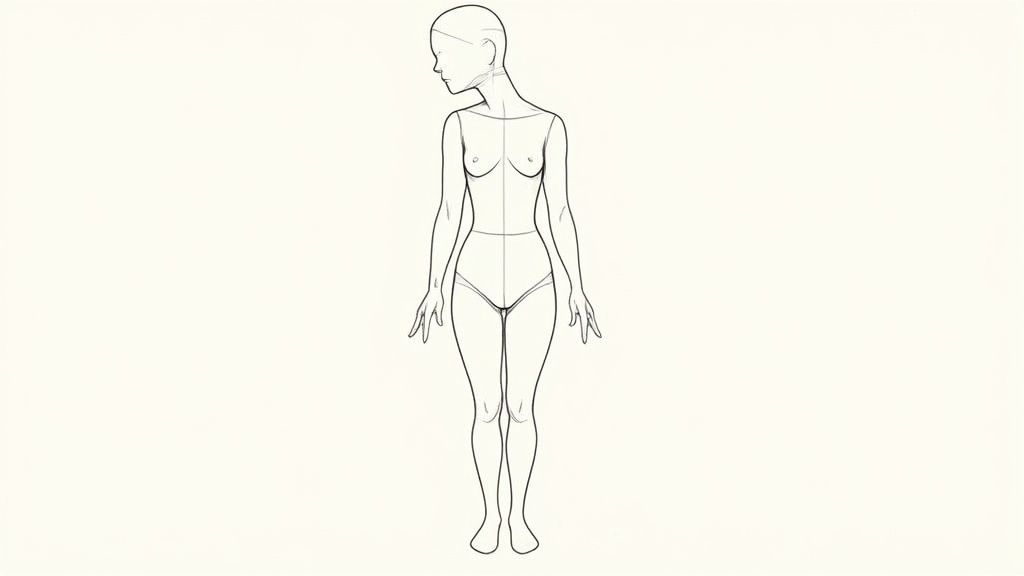
Creating a Graceful Pose
With the head mapped out, we can move on to her body. Instead of drawing stiff, straight lines, think about Jasmine’s natural elegance. A great trick is to sketch a gentle, flowing "S" curve from her neck down to her hips. This is what artists call the line of action, and it's a secret weapon for making your drawings feel alive and dynamic, not stiff.
Now, use simple ovals and cylinders to build her torso, arms, and legs, arranging them naturally along that S-curve.
- Torso: Use two ovals—a smaller one for her upper chest and a slightly larger one for her hips.
- Limbs: Simple cylinders work great for her arms and legs. Just connect them to the torso.
- Joints: A small circle for each shoulder, elbow, and knee will help you position everything correctly.
This foundational method is a game-changer for artists. It’s used for everything from classic animation to modern character design. If you want to dive deeper into these core skills, we have more guides to help you learn to draw.
Jasmine's popularity makes her an amazing character to practice with. Since her debut in 1992, she's been in at least six films that have collectively earned hundreds of millions of dollars worldwide. You can find more fun facts about her story over at Disney News.
Pro Tip: Keep your lines light and easy to erase at this stage. Also, try looking at the negative space—the empty shapes around her body. For example, instead of just drawing her arm, look at the triangular shape created between her arm, her torso, and the ground. Fixing that empty space often fixes the arm itself.
Defining Jasmine's Expressive Facial Features
Jasmine's personality really shines through in her face, and it all starts with her eyes. This is the part where your drawing transforms from a simple figure into the spirited princess we all know. Let's really dig into the details that make her so uniquely expressive.
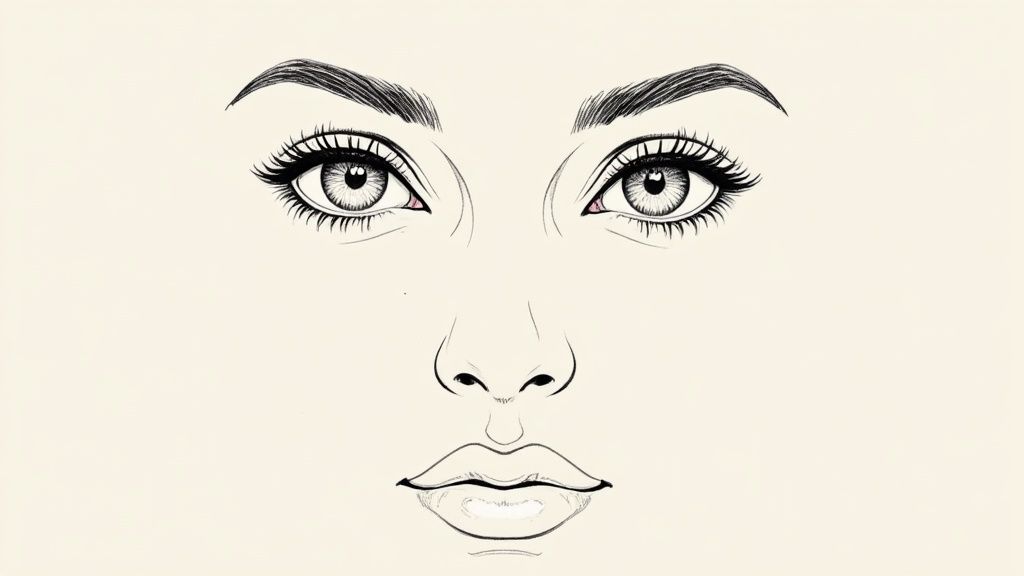
Her most famous features are those huge, almond-shaped eyes. Go back to that horizontal guideline you drew earlier and sketch in two large ovals that tilt upwards at the outer corners. Don't hold back here—make them prominent, as they're one of her defining characteristics. A good rule of thumb is to leave about one eye's width of space between them to keep things looking balanced.
Now for that classic Disney princess look: add a dark, thick lash line along the top of each eye. Extend it just a bit past the corner into a subtle cat-eye flick. This little detail is crucial for capturing her determined and sometimes defiant gaze. A few long, curved lashes will complete the effect.
Crafting Her Unique Nose and Lips
Jasmine's nose is surprisingly simple but very elegant. Starting from the inner corner of each eye, draw two light lines that curve gently inward as they travel down. The tip isn't sharp or pointy; think of it as a small, soft "v" shape that gives it a rounded finish.
Her lips are full and beautifully defined. When you sketch the top lip, make sure to give it a distinct Cupid's bow. The bottom lip should be just a touch larger and rounder. A simple curved line between them is all you need for a gentle smile or a more pensive expression.
Expression Tip: The smallest tweaks to her eyebrows or mouth can completely change her mood. For a determined look, give her eyebrows a sharp, high arch. For a happy expression, curve the corners of her lips up and maybe even widen her eyes just a bit. A practical example is to lower the inner corners of her brows to show anger, or raise them to show surprise.
Adding Color for a Lifelike Feel
Once you’re ready to bring her to life with color, choosing the right shades is key to adding depth. Here are a few actionable insights that really make her features pop:
- Eyes: A warm, rich brown is perfect for her irises. Don’t forget to leave a small white dot as a highlight—it instantly adds that sense of life and sparkle. For shading the whites of her eyes, instead of using gray, try a very light blue or lavender. It makes them look so much brighter.
- Skin Tone: Lay down a base tan color first. Then, use a slightly darker, warmer brown (like a burnt sienna) to add shadows under her nose, just below her bottom lip, and along her jawline to create dimension.
- Lips: Use a dusty rose or a soft red. To make her lips look more three-dimensional, add a tiny highlight of white or a lighter pink right on the fullest part of her bottom lip where the light would naturally hit.
These coloring techniques are what will truly make your Princess Jasmine drawing feel alive, capturing that expressive spirit she's so loved for.
Sketching Her Signature Hair and Outfit
Now that we’ve captured her face, it’s time to bring the rest of her iconic look to life. Her voluminous hair and classic turquoise outfit are what make her instantly recognizable, and they’re easier to tackle than you might think once you break them down.
Jasmine’s hair has incredible volume and life. An actionable tip is to stop thinking about individual strands and start seeing big, flowing shapes. You're essentially drawing two main sections: a rounded puff on top that frames her face and a long, teardrop-shaped ponytail.
To get that sense of weight and movement, use long, sweeping S-curves to outline these shapes. Don't be afraid to let your pencil flow.
You'll notice her ponytail is held together by a couple of bands. Just sketch these in as simple cylinders wrapping around the hair—one near the top and another toward the bottom. This little detail is crucial for creating that unique, segmented silhouette we all know.
Detailing Her Famous Costume
Alright, let's move on to that famous turquoise outfit. The real challenge here is to make the fabric feel soft and airy, not stiff.
For her billowy pants, use gentle, curved lines that gather at her ankles. Avoid straight, sharp folds. Instead, let your lines undulate to suggest a lightweight material. A practical example: draw a few soft "C" and "S" shaped lines near her knees and ankles to create a convincing illusion of soft gathers.
Her top is basically a simple bandeau. Add a slight drape at the bottom and a few subtle creases where the fabric would naturally bunch—like under her arms—to give it a touch of realism.
And of course, we can't forget the jewelry. Her big, golden earrings are really just two connected teardrop shapes. For the headband, a simple oval is all you need for that central sapphire.
Coloring Advice: When you get to coloring, resist the urge to use a single flat turquoise. A better approach is to use a slightly darker teal or blue for the shadows inside the fabric folds. Then, hit the areas where light would catch—like the top of her shoulders or the fullest part of her pants—with a very light turquoise or even a hint of pale green. This simple technique adds so much depth and makes the whole outfit pop.
Bringing Your Drawing to Life with Color
Okay, your line art is done, and it’s looking sharp. Now for the fun part—bringing Princess Jasmine to life with color! This is where the real magic happens, transforming your sketch from a flat drawing into a dynamic piece of art. It doesn't matter if you're using markers, colored pencils, or a digital tablet; the goal is to make it pop.
Before you lay down a single color, take a moment to decide where your light is coming from. A practical example: imagine a light source in the top left corner of your page. This means the left side of her face and the tops of her shoulders will be lighter, while shadows will fall on the right side and underneath her hair. This simple decision is the key to creating depth.
Choosing Your Jasmine Color Palette
Getting the colors right is everything for an iconic character like Jasmine. Her look is all about that signature turquoise, dazzling gold, and warm, sun-kissed skin. Here are some actionable coloring tips:
- Outfit: Her top and pants are a vibrant turquoise. Don't just fill it in with one flat color. Use a darker teal or even a touch of navy blue for the shadows in the fabric folds. For highlights, a super light, almost-white green on the areas where the light hits will make the material look silky.
- Accessories: For her massive earrings and headband, you’ll want a rich, warm gold. Use a dark brown for the shadows to give it a metallic look, and then add a pop of pale yellow or pure white for the glint of light. For example, add a small, bright white dot on the curve of each earring to simulate a shine.
- Skin Tone: A medium tan is a great base for her skin. To create shadows under her nose and jawline, reach for a warmer, reddish-brown. For highlights on her cheeks and the bridge of her nose, a light peach or cream color works perfectly.
Pro Tip: When shading the whites of her eyes, steer clear of using a simple gray. It can make them look dull. Instead, try a tiny bit of pale blue or lavender. It's a subtle trick that makes the eyes look so much brighter and more alive.
Below is a quick reference table I put together to help you nail those classic Jasmine colors.
Princess Jasmine Color Palette Guide
Here’s a guide to the essential colors you'll need to bring your drawing of Princess Jasmine to life, along with some tips for shading and highlights.
| Feature | Primary Color | Shading Color | Highlight Color |
|---|---|---|---|
| Outfit | Bright Turquoise | Dark Teal or Navy | Light Mint Green |
| Jewelry | Warm Gold | Dark Brown or Ochre | Pale Yellow or White |
| Skin | Medium Tan | Reddish-Brown | Light Peach or Cream |
| Hair | Black | Deep Blue or Purple | Light Gray or Blue |
| Eyes | Brown | Dark Brown | White or Light Tan |
Remember, these are just guidelines. Feel free to play with the shades to match your personal style and the mood you want to create!
Coloring well is a skill that builds with practice. Once you feel comfortable, why not try your hand at another beloved character? We have a great tutorial on how to draw Spider-Man that will let you test these same coloring principles on a completely different design.
Common Questions About Drawing Jasmine
When you're first learning to draw Princess Jasmine, it’s completely normal to run into a few tricky spots. Honestly, everyone does. Let's walk through some of the questions I hear most often from other artists so you can get past them and enjoy the process.
One of the first hurdles is almost always her face, specifically getting those iconic proportions right. Her large, almond-shaped eyes are her most recognizable feature, but their size can make it tough to keep everything symmetrical.
Artist's Insight: My best advice here is to trust the guidelines you lay down at the start. Use a very light horizontal line across the face to make sure both eyes are on the same level. A practical warm-up is to practice sketching just her eyes a few times on a scrap piece of paper. It builds muscle memory and confidence before you dive into the final piece.
Getting the Details Right
What is the hardest part of drawing Princess Jasmine?
After the eyes, capturing a natural, graceful pose is the next biggest challenge. It's easy for the drawing to look stiff. To avoid this, always start with a flowing 'line of action'. This is an actionable technique: before drawing any body parts, sketch a single, curved line that represents the flow of her spine. This one simple line will bring so much movement into your sketch right from the get-go.
What art supplies are best for a beginner?
You really don’t need to break the bank. A standard HB graphite pencil, a quality eraser (like a kneaded eraser, which won't leave residue), and some basic drawing paper are all you need for sketching. When you're ready to add color, a starter set of colored pencils is a fantastic choice because it gives you great control for blending and layering colors.
How do I choose the right skin tone colors?
Layering is your best friend here. Here is a practical workflow:
- Base: Start with a light tan or medium brown, applying it with gentle pressure.
- Shadows: For areas like under her chin or along the hairline, pick a slightly darker, warmer brown (like a sienna) and layer it on top of the base.
- Highlights: Use a touch of light peach or cream on the high points of her face, like her cheekbones and the bridge of her nose. This will really make her features pop.
If you're looking for more general tips on character art, you can find some great advice by exploring guides on drawing cartoon characters for beginners.
At Colortada, we're all about making creativity fun and accessible for everyone. Check out thousands of our free coloring pages to practice your skills or just to find a relaxing activity for yourself or the family. Dive into a world of color today at https://www.colortada.com.
