Learning how to draw a dress really boils down to three simple building blocks: first, you sketch a torso, then you define a neckline, and finally, you add the skirt. When you focus on these core shapes, you create a solid foundation. This makes adding all the fun details and different styles so much easier, turning that blank page into a fashion sketch with confidence.
Getting Started on Your First Dress Sketch
Staring at a blank page can be a little intimidating, right? But the secret to a great dress drawing isn't about having the fanciest equipment or knowing complex anatomy. It's all about giving yourself a simple, reliable starting point. You really don't need a pricey art kit; a regular pencil and some paper are more than enough to get going.
The key is to use a basic torso shape as your guide. This template, often called a croquis in the world of fashion design, basically acts as a mannequin for your dress. Using one from the get-go ensures your design has realistic proportions right from the start.
This simplified process shows how breaking it down into three stages—Torso, Neckline, and Skirt—gives you a clear roadmap.
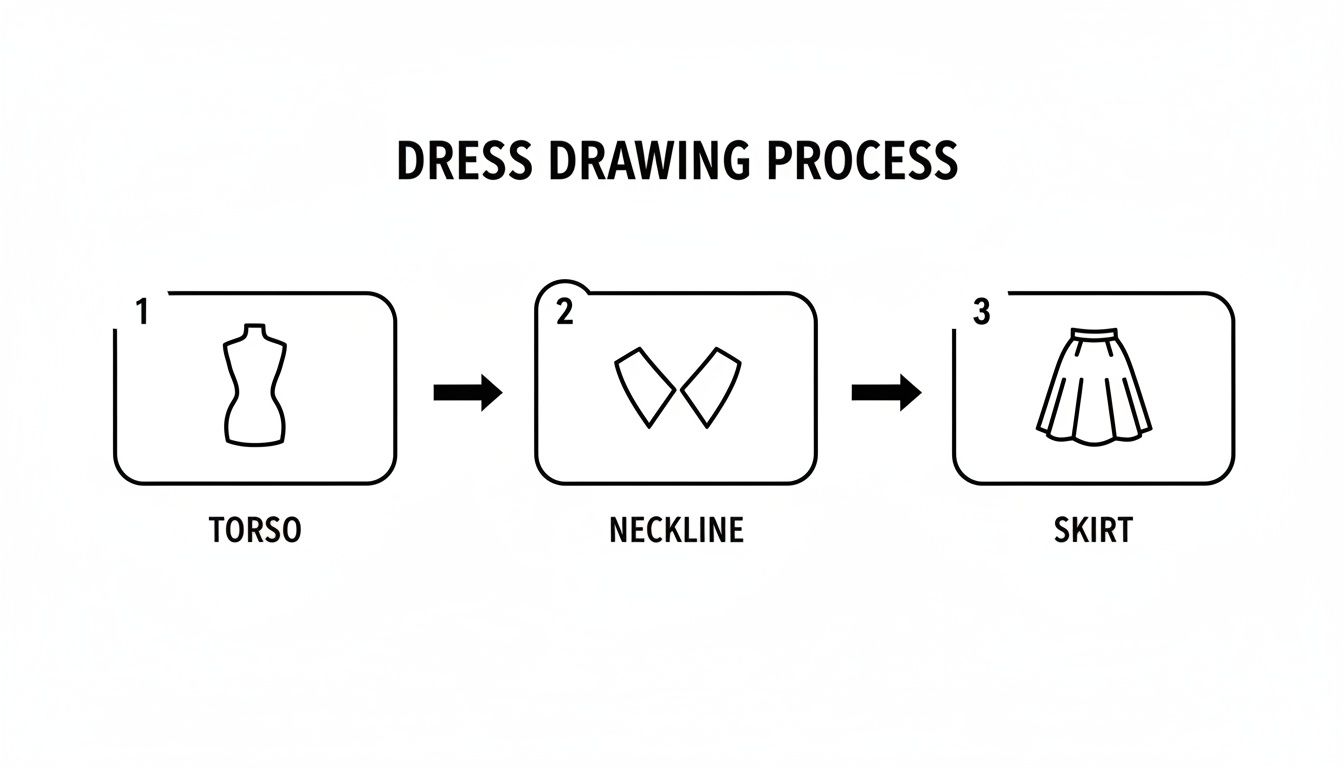
Starting with the torso first provides the structure. Then, the neckline helps define the upper style of the dress. Finally, the skirt completes the overall silhouette. It’s a simple, logical flow.
The Foundational Shapes
Your very first step is to lightly sketch this torso shape. Don't press too hard or worry about perfection at this stage. Just think of it as a simple hourglass or maybe an elongated "S" curve. This gives you a natural-looking base to build on.
Once your torso is in place, you can define a simple neckline at the top—something like a scoop neck or a V-neck works great. For example, to draw a V-neck, simply draw two straight lines meeting at a point in the center of the chest. From there, just add the flowing lines of a skirt, extending outwards from the waist.
This methodical approach takes the guesswork out of it and really helps build confidence. You get to focus on one shape at a time instead of feeling overwhelmed by the entire drawing at once. For more ideas and practice sheets, check out our collection of free resources for beginner drawing projects.
The most effective fashion sketches communicate an idea clearly. A simple torso, a defined neckline, and a flowing skirt are the fundamental elements that tell the story of your design before any details are even added.
Your Essential Drawing Toolkit
You don't need to raid an art supply store to start drawing. A few simple, quality tools will serve you well, especially when you're just getting the hang of it. Here’s a quick rundown of what I recommend keeping on hand.
| Tool | Recommended Type | Why It's Useful |
|---|---|---|
| Pencils | A set with varying hardness (e.g., 2H, HB, 2B) | The 2H is great for light initial sketches, HB is your all-purpose pencil, and the 2B is perfect for adding darker lines and shadows. |
| Paper | Standard printer paper or a dedicated sketchbook | Printer paper is cheap and perfect for practice. A sketchbook keeps all your work in one place and often has a better texture. |
| Eraser | Kneaded eraser or a white vinyl eraser | A kneaded eraser won't leave smudges or tear your paper. A white vinyl eraser is precise and great for clean lines. |
Having these basics ready means you can jump right into sketching whenever inspiration strikes, without getting bogged down by too many choices.
Understanding the Bigger Picture
This technique of sketching onto a figure is a cornerstone of fashion illustration. As you get more comfortable, it helps to understand the broader field of What Is Fashion Illustration.
Learning a bit about the history and purpose behind this art form can really spark your creativity and give you a deeper appreciation for the process. Your journey into drawing dresses is a fun first step into a rich, expressive world where just a few simple lines can bring a complete vision to life.
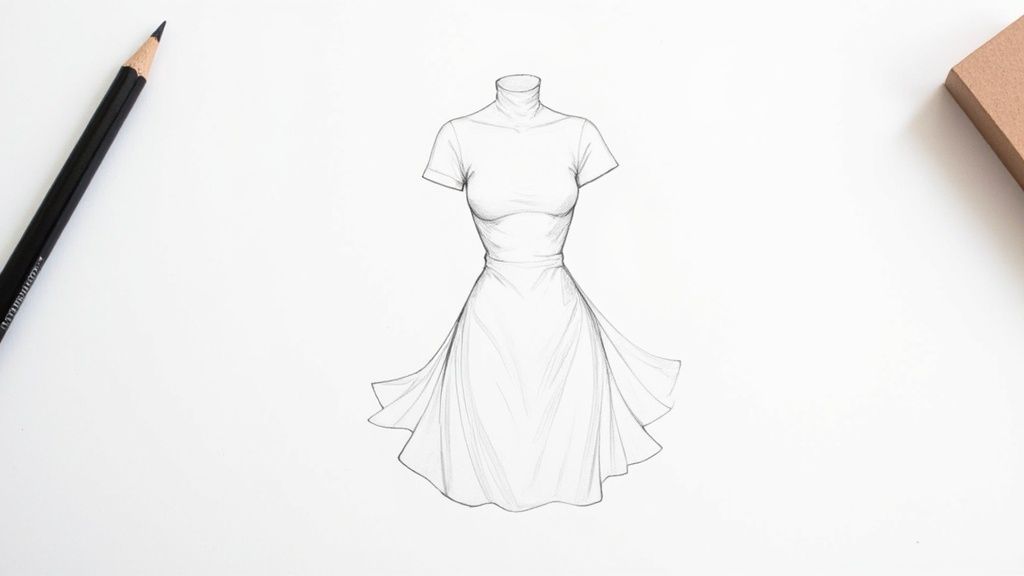
Drawing a Classic A-Line Dress
Alright, now that we’ve warmed up with some basic shapes, it’s time to put it all together and draw your first complete dress. We're going to start with the classic A-line dress. It’s a fantastic design for beginners because its shape is so clear and forgiving.
The beauty of the A-line is its timeless simplicity. It’s fitted through the chest and shoulders, then flares out gently from the waist—just like a capital letter 'A'. Instead of rigid, numbered steps, I'll walk you through this with a more natural, creative flow. This way, you’ll start to see how the pieces of a dress connect, which is the key to drawing any style you can dream up later.
Defining the Bodice
Let’s begin with the bodice, which is just a fancy word for the upper part of the dress. Grab the torso shape you sketched earlier and use it as your guide. Lightly sketch the outline of the top, thinking about how the fabric would actually rest on a person. For an A-line, the bodice is usually fitted, but not uncomfortably tight.
Feel free to play with the neckline. A simple scoop neck is a great starting point, or maybe a classic boat neck. From there, draw the shoulder seams and the armholes. Remember to give them a gentle curve—fabric wraps around the body, it doesn't just sit flat. Getting this initial framework right is what makes the final drawing look believable.
Creating the Signature Skirt
Once you have the bodice sorted, it's time to create that iconic 'A' shape. Find the narrowest point of the waist on your torso guide. From there, draw two lines flaring outwards and downwards.
The angle you choose for these lines completely changes the feel of the dress. For example, a gentle 15-degree flare gives you a subtle, everyday A-line, while a wider 45-degree angle creates a much more dramatic, full skirt. Don't stress about getting the lines perfectly straight! A slight curve will suggest the soft drape of fabric and make your drawing feel much more alive. The length is totally up to you—it could be a playful mini, a timeless knee-length, or an elegant maxi.
A little tip I always share with my students is to play with your line weight. Use a slightly thicker, more confident line for the main outline of the dress. Then, for the details inside—like seams, folds, or patterns—switch to a lighter, thinner line. This one simple trick adds instant depth and makes your drawing look so much more professional.
Coloring Your A-Line Creation
With your line work done, the fun really begins! Bringing your sketch to life with color is where you get to give the dress its personality. Is it a bright, sunny yellow dress for a picnic, or a deep navy blue for a special event? The A-line is a blank canvas.
Here are a few actionable insights to help you get started:
- Choose a Light Source: Before coloring, pick a direction for your light (e.g., top left). This determines where all highlights and shadows go.
- Layer Your Colors: Don't press hard immediately. Start with a light base color over the whole dress. For a red dress, use a light red first. Then, build up darker reds in shadowed areas (like under the skirt folds) and leave the base color showing in lit areas. This creates a rich, realistic look.
- Shadows Add Depth: Shadows appear where fabric folds or is hidden from light. On an A-line skirt, add darker tones along the inside of the flared lines and where the fabric bunches at the waist.
- Highlights Create Form: The parts hit directly by light should be brightest. You can achieve this by coloring lightly or leaving the white of the paper. For instance, on a satin dress, a sharp, uncolored streak can create a realistic shiny effect. For cotton, a softly blended lighter tone works better.
Exploring Different Silhouettes and Styles
Once you've nailed the classic A-line dress, a whole new world of fashion design starts to open up. This is where the fun really begins! Think of that A-line as your trusty foundation; now you can build on it to create all sorts of incredible shapes.
From here, you can learn to sketch a dramatic ball gown, a sleek sheath dress, or a playful fit-and-flare. Each silhouette tells a completely different story, and getting a feel for their basic shapes is how you’ll bring your own unique designs to life.

Drawing Three Core Silhouettes
Let's walk through how to tackle three of the most popular dress styles. You'll start each one with the same torso guide you've been practicing, but the skirt is what completely changes the game.
- The Ball Gown: For this showstopper, you need to think big. The skirt has a much wider base than an A-line, flaring out dramatically from the waist. Use sweeping, curved lines to give it that sense of volume and opulence. Actionable Tip: Start the skirt lines almost horizontally from the waist before curving them down to create maximum fullness.
- The Sheath Dress: This is pretty much the opposite of a ball gown. A sheath is all about clean, straight lines that follow the body's natural shape. Instead of flaring out, the skirt runs straight from the waist to the hem for a sophisticated, streamlined look.
- The Fit-and-Flare: Just like the name says, this style is snug on top and flares out right at the waist. Unlike the A-line's gentle slope, the fit-and-flare has a more defined, almost circular skirt. It’s a fun, flirty silhouette that’s made for twirling!
A great way to get inspired is to look at how designers create flattering dresses for different body types. Seeing these principles in action can really help you nail the proportions in your own sketches.
Proportions and Personality
Getting the proportions right is how you give each dress its own personality. A ball gown, for instance, looks its best as a full, floor-length maxi dress—it really emphasizes the grandeur. A sheath dress, on the other hand, is often most effective at knee-length, which plays up its chic, professional vibe.
This is your first real step into the creative side of fashion design. It’s a massive industry—the global fashion market is projected to be worth $1.84 trillion by 2025—which means there's always a need for fresh, creative ideas.
The silhouette is the single most important element of a dress design. It’s the first thing the eye sees and it sets the entire mood before a single color or detail is even considered.
Coloring Different Styles
Your coloring strategy should reflect the style of the dress. For a huge ball gown, you'll want to use deeper shadows in the folds of the skirt to create a sense of depth and weight. Practical Example: Use a dark blue pencil in the deepest folds of a blue gown, then transition to a medium blue, and finally a light blue on the most prominent surfaces. For a shiny satin sheath dress, sharp, bright highlights will show how the light bounces off its smooth surface.
Coloring is more than just staying in the lines; it’s about making the shape you've drawn pop. If you want more practice with defining shapes before you add color, we have some fantastic templates and tips in our outline drawing guide.
Bringing Your Dress to Life with Details
This is where the magic really happens. A basic outline gives you a dress, but the details give it a soul. We're moving past the simple shape and into the little things—the ruffles, pleats, and textures—that will make your design pop right off the page.
Think of these embellishments as the personality of your dress. They're what tell the story of its style, movement, and feel. Mastering these small touches is what separates a simple sketch from a piece of fashion art.
How to Draw Ruffles, Pleats, and Bows
Let's break down three of the most common details you'll want in your artist's toolkit. Each one has its own little trick.
- For soft, flowing ruffles: Start with a simple wavy line, like a ribbon floating in the breeze. Now, connect the high points to the low points with gentle, curved lines. This immediately creates the look of folded fabric. Actionable Tip: Add a touch of shadow on the inside of each curve to make the ruffle look three-dimensional.
- For crisp, sharp pleats: If you want that sharp, tailored look of knife pleats, begin with a set of straight, parallel lines. Then, simply connect the tops and bottoms with short, diagonal lines, making sure they all slant the same way. It creates a neat little zigzag pattern that reads perfectly as folded fabric.
- For a perfect, elegant bow: I always start with a small circle for the central knot. From there, draw two big, loopy teardrop shapes on either side. Finish it off with two ribbon tails flowing down from the knot. Add a few quick lines inside the loops to hint at the fabric's folds, and you’re done!
With just a few simple techniques, a flat sketch starts to feel three-dimensional and full of energy.
A little secret I've learned over the years: you don't need to draw every single fold perfectly. The suggestion of a pleat or a ruffle with a few confident lines is often more powerful than a painstakingly detailed drawing.
Using Your Pencil to Create Fabric Textures
Your pencil isn't just for drawing lines; it's a tool for creating texture. The way you shade and sketch can tell the viewer if the dress is made of shiny silk or cozy wool.
Want to draw something that looks like silk or satin? Use long, smooth, confident strokes. Keep the shading light and add a few bold, bright highlights where the light would bounce off the fabric. That strong contrast between light and dark is what sells the illusion of shine.
For a heavier material like tweed or thick wool, switch up your technique. Use short, crisscrossing lines (this is called cross-hatching) to build up a rougher texture. It makes the fabric feel dense and matte. And for something soft and comfy like cotton? Go for gentle, blended shading with soft edges to give it that comfortable, lived-in feel. It’s these subtle shifts in your pencil work that truly make a drawing believable.
Bringing Your Sketch to Life with Color
Okay, you've got the perfect outline. Now for the fun part: bringing your dress drawing to life with color! This is where you get to decide the whole mood of the piece. The colors you choose will tell us if it’s a bright, cheerful sundress or a dramatic, formal gown. Your sketch is the blueprint, but color is what gives it a soul.
The secret to rich, vibrant color isn't about mashing your crayons or colored pencils into the paper. It's all about layering. Think of it like building a flavor in cooking. Start with a light, even layer of color and gradually build up the intensity. This technique gives you deep, nuanced tones that look way more realistic than one heavy-handed coat.
Mastering Shading and Dimension
Shading is the magic trick that turns a flat drawing into something with shape and weight. It's what makes the fabric look like it has real folds and curves, giving your dress a believable, three-dimensional form.
Before you add a single shadow, you need to decide on your light source. Where is the light coming from? The top left? Directly in front? Once you pick a direction, stick with it. Every shadow you draw will fall on the side of the dress opposite from that light.
It's a simple rule, but it creates instant depth. If light hits the front of the skirt, you’ll naturally add shadows along the sides and tucked deep within the folds where light can’t reach. If you want a deeper dive into making your drawings pop, exploring some foundational shading techniques can be a huge help.
The most convincing dress drawings use color to sculpt the fabric, not just fill it in. Think of your coloring tools as a way to create light and shadow, which is what builds the illusion of a real garment.
Practical Coloring Examples for Different Fabrics
Not all fabrics look the same, so your coloring approach shouldn't be one-size-fits-all. A shiny satin dress reflects light completely differently than a soft cotton one. Changing how you color and shade based on the material you're trying to draw will take your artwork to the next level.
How you use your colors can make a drawing look like shiny silk or cozy velvet. The table below breaks down a few simple approaches for common textiles.
Coloring Techniques for Different Fabrics
| Fabric Type | Coloring Technique | Key Tip |
|---|---|---|
| Satin or Silk | Create high-contrast areas with bright highlights directly next to deep shadows. | Leave some small areas almost white to mimic the intense reflection of light. |
| Cotton or Linen | Use soft, gradual shading with smooth transitions from light to dark. | Avoid harsh lines. Blend your colors well for that matte, light-absorbing look. |
| Velvet | Combine very dark, rich base colors with small, bright highlights to show the plush sheen. | The shadows need to be extra deep to convey the fabric's luxurious, dense texture. |
By thinking about the fabric first, you’ll add a stunning layer of realism to your work. It's these little details that really make a drawing stand out and look complete.
Getting Past Common Drawing Stumbles
Every artist has those moments. You step back from your drawing, and something just feels… off. It’s not failure, it’s just part of the process! Think of these hiccups as fantastic learning opportunities.
When you're figuring out how to draw a dress, a couple of classic challenges tend to appear. But don't worry, they have surprisingly simple fixes. Most often, artists struggle with wonky, lopsided designs or fabric that looks stiff as a board. Let's tackle those head-on.
Fixing Lopsided Symmetry
We've all been there. You finish a sketch, hold it up, and realize one side is way wider or longer than the other. It's a super common problem, especially for beginners.
The best trick I've learned is to start with a faint vertical centerline. Before you draw a single outline of the dress, just lightly pencil a straight line down the middle of the torso. This simple line becomes your guide, your mirror. As you draw the left side of the dress, you can visually check it against the centerline to help you match the curves and angles on the right. It’s a game-changer for creating balanced, polished-looking designs.
Bringing Fabric Folds to Life
Making fabric look like it has actual weight and movement can be tricky. It's easy to fall into the trap of drawing random zigzags that make a dress look rigid and unnatural.
The secret is to remember that fabric responds to gravity and the body underneath it. It doesn't just hang there; it pulls, bunches, and flows.
To get the hang of it, think about where the fabric would realistically gather or stretch:
- Where it’s cinched at the waist.
- Around a bent arm in a long sleeve.
- Flowing down from the hips in a long skirt.
Instead of drawing sharp, pointy lines, try using soft, flowing "C" and "S" shapes to show the drapery. A little bit of soft shading inside these curves will instantly add depth, making the fabric look like it has real weight and motion.
Here's a pro tip: Think of fabric as being pulled or hanging between two points. A cowl neckline, for instance, is really just fabric sagging gracefully between the shoulders. If you can visualize that tension, you'll draw believable folds every time.
At Colortada, we believe there's an artist inside every child. Ready for more creative fun? Dive into our huge library of free, printable coloring pages for the whole family over at https://www.colortada.com.
