Learning to draw a plant is all about seeing the simple shapes hidden inside. Seriously, that's the whole secret. You can create some really beautiful botanical art just by starting with basic forms like circles, ovals, and lines. It’s the perfect starting point for kids and beginners.
You're not drawing a whole plant at once; you're just combining these simple shapes to build something that looks surprisingly complex and natural.
Let's Start Drawing Some Plants
Ready to give it a shot? I promise it’s much easier than you think. This guide was made for absolute beginners, proving that anyone can create charming plant drawings with nothing more than a pencil and paper. Forget feeling intimidated—we're going to focus on seeing the simple structure within every leaf and stem.
This whole idea of observing and drawing plants isn't new; it has a pretty cool history. The first botanical illustrations we know of are from the 1st century CE, when artists made detailed drawings to help people identify medicinal plants. If you're curious, you can explore the history of botanical illustration and see how people have been capturing nature for centuries.
The Building Blocks of a Plant Drawing
The trick is to stop seeing a "plant" and start seeing the shapes that make it up. That leafy houseplant in the corner isn't one big, complicated object. It’s actually just a collection of simple parts you can tackle one by one:
- The Pot: Think of this as a cylinder or a slightly tapered square. Actionable Insight: For a classic terracotta pot, draw a short, wide cylinder for the rim and connect a slightly narrower, bucket-like shape underneath.
- The Stems: These are just a few simple, curving lines reaching up. Practical Example: Draw a main stem like a gentle 'S' curve, then add smaller stems branching off it like the letter 'Y'.
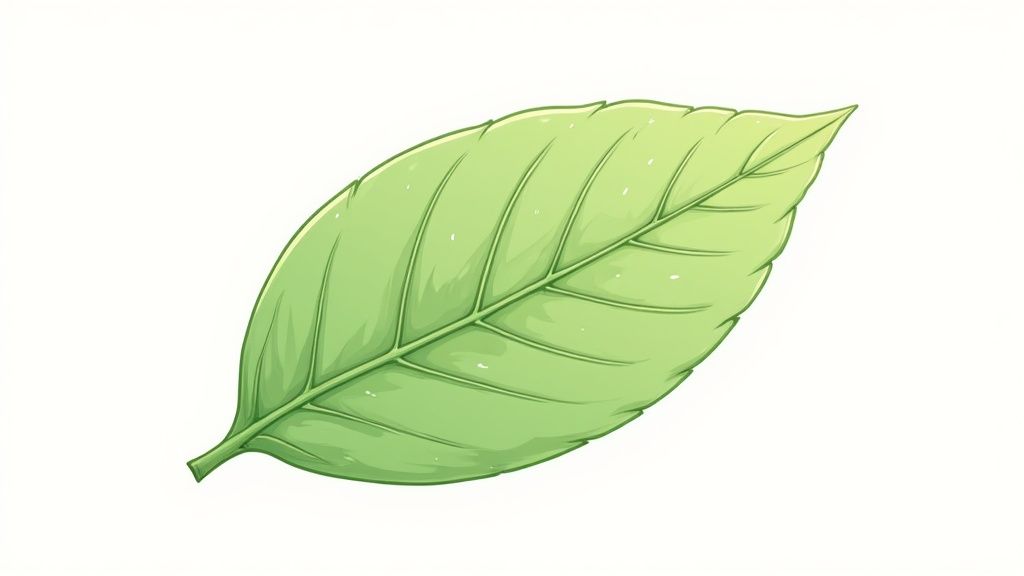
- The Leaves: Ovals, hearts, or teardrop shapes—whatever you see—attached to those stems. Actionable Insight: Look at a real leaf. Notice the central line (the midrib)? Drawing that first gives you a perfect guide for the leaf's shape and direction.
When you focus on these basic components individually, the pressure to get everything "right" just melts away. You're just doodling shapes, and anyone can do that. This approach is fantastic for building confidence and gives you the skills to start drawing fun, vibrant plants in just a few minutes.
Choosing Your Simple Art Supplies
Ready to start drawing? The good news is you don't need a fancy, expensive art setup. In fact, some of the best drawings start with the simplest tools you probably already have lying around the house.
Let's begin with the basics. A standard HB pencil is your go-to for sketching out your initial ideas. It makes a light mark that's super easy to erase, which is exactly what you want when you're figuring out your shapes. And that brings us to your other essential tool: a good eraser. Think of it as your "undo" button, letting you make changes and tweaks without any stress.
Picking Your Coloring Tools
Once you've got your pencil sketch just right, it's time for the fun part—adding color! The tools you choose here will completely transform your plant drawing.
- Colored pencils are perfect if you love adding tiny details and soft shadows. They give you amazing control for blending colors.
- Markers are your best bet for big, bold, vibrant color. They make your drawings pop right off the page.
- Watercolors create a softer, more dreamy effect. They're wonderful for a blended, artistic style.
Each one gives your plant a totally different personality, so feel free to experiment!
This quick table can help you decide which tool fits the vibe you're going for.
A Beginner’s Guide to Coloring Tools
This quick comparison helps you pick the right tools for your plant drawing style, from vibrant markers to soft colored pencils.
| Tool | Best For | Difficulty Level | Pro Tip |
|---|---|---|---|
| Colored Pencils | Shading, fine details, and layering colors. | Easy | Start with light pressure and build up color in layers for a richer look. Use a white pencil to blend colors smoothly. |
| Markers | Bold, flat colors and crisp lines. | Easy to Medium | Use a light touch to avoid bleeding. Test colors on a scrap piece of paper first! Color in small, circular motions to avoid streaks. |
| Crayons | Textured, waxy finishes and simple coloring. | Very Easy | Perfect for little hands. Can be hard to erase, so best for final coloring. Press harder for bold color, lighter for a softer look. |
| Watercolors | Soft, blended, and translucent effects. | Medium to Hard | Use less water for more vibrant colors and more water for a lighter wash. Let one color dry before adding another next to it to prevent muddying. |
Don't feel like you have to rush out and buy the most expensive art supplies on the shelf. The best tools are simply the ones you enjoy using the most.
Pro Tip: Many starter sets for kids and beginners are fantastic quality and won't break the bank. They're a great way to try out different mediums without a big commitment.
If you want a deeper dive into all the options out there, check out our complete guide to the best art supplies for kids—it’s packed with helpful advice for artists of any age.
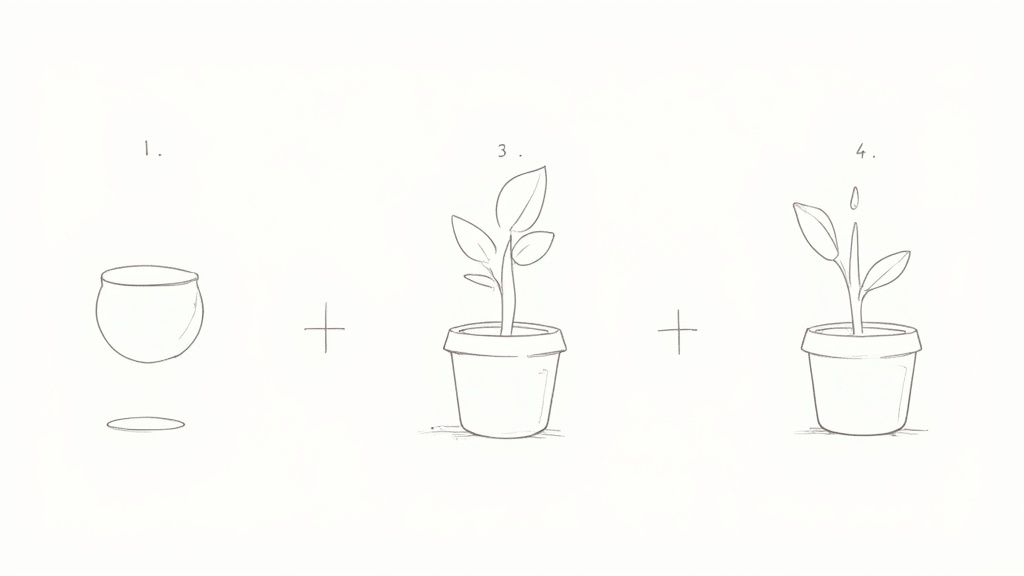
Create Your First Potted Plant
Ready to draw? Let's start with a classic potted plant. It's a fantastic first project because you're just combining a few simple shapes to create something you'll instantly recognize. Forget about getting every line perfect—the real goal here is to have fun and see how a few basic forms can come together to make a great little drawing.
First things first, let's get that pot on the page. Grab your pencil and lightly sketch a shape like an upside-down trapezoid. You can also think of it as a square that's a little wider at the top than the bottom. To give it a nice rim, just add a thin, flattened oval or a narrow rectangle right across the top. This one tiny detail is a game-changer; it immediately makes your pot look more like a real, 3D object.
Drawing Stems and Leaves
Okay, pot's done. Now, let's give our plant something to grow on. From inside the rim of the pot, draw two or three gently curving lines reaching upward. These are your main stems. Try to make them slightly different heights and have them lean in different directions. This little bit of variation is what makes a drawing feel natural and alive, not stiff.
Now for the best part—adding the leaves! Using those stems you just drew as your guide, start attaching simple leaf shapes. Ovals or heart shapes are perfect for this. Don't just stick them on randomly; vary their sizes and the angles they're pointing.
Pro Tip: Let some of the leaves overlap each other. It’s a super simple trick that instantly creates a sense of depth and makes your plant look fuller and much more interesting.
This basic workflow—sketching big shapes, adding details, and refining—is the foundation for pretty much anything you'll ever want to draw. This little infographic nails the core idea.
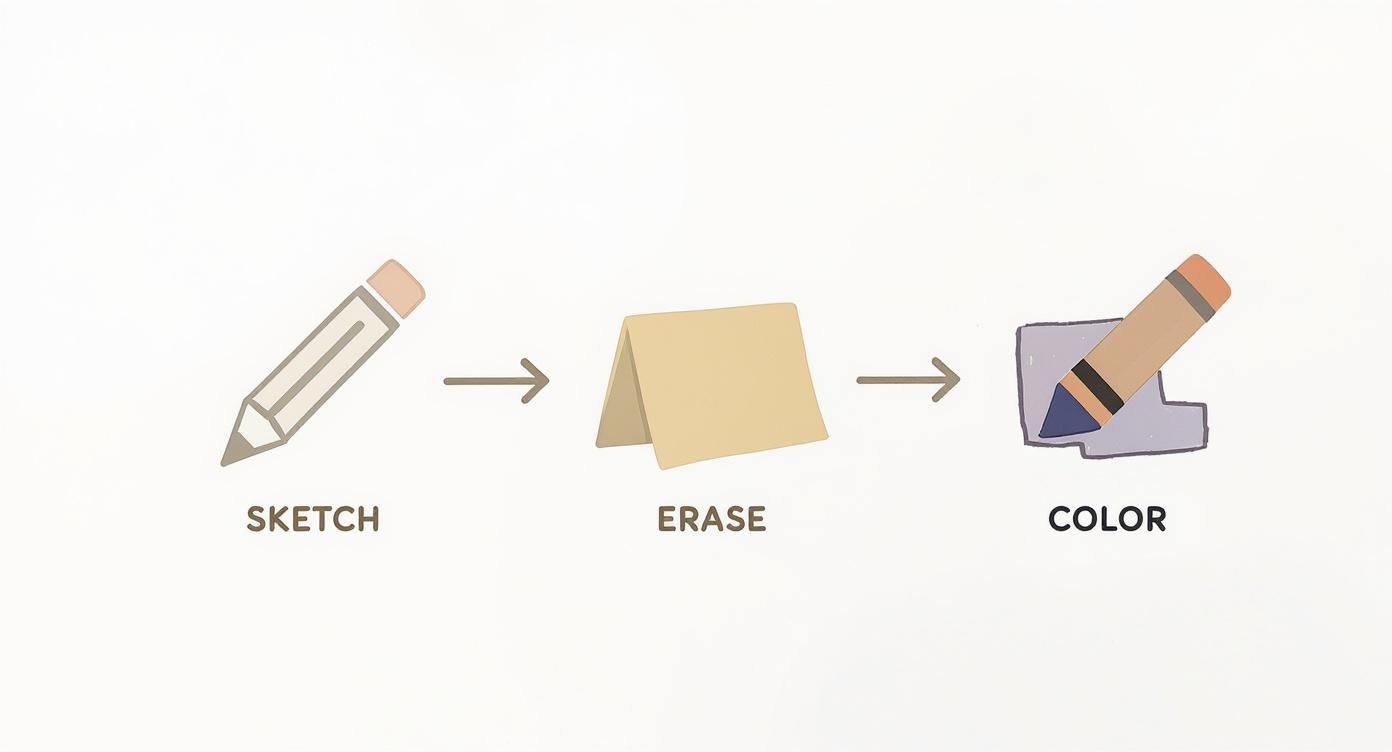
It really is that simple. Start with a light sketch, clean up your lines, and then bring it to life with color.
Adding Color and Personality
Once you're happy with your pencil sketch, it's time to break out the colors. This is where you can really let your plant's personality shine.
For the leaves, try using more than one shade of green. Coloring Advice: Start by coloring the entire leaf with a light green. Then, grab a darker green and add a shadow along the bottom edge of the leaf and along the central stem. This simple shading technique adds dimension and really makes your plant pop off the page.
And the pot? Go wild! Earthy colors like terracotta orange, brown, or gray always look great, but there are no rules. A bright blue or a sunny yellow pot can be a fun statement. You could even add a simple pattern like stripes or polka dots for an extra touch of character. It's your drawing, so make it one-of-a-kind.
Exploring Different Leaf and Flower Shapes
Now that you’ve got the hang of a basic potted plant, it's time to branch out! The real fun in drawing plants comes from capturing their unique personalities, and that's all in the shapes of their leaves and flowers.
Artists have been obsessed with this for centuries. Back in the 19th century, botanical illustration absolutely exploded. With new botanical gardens popping up and a public craze for all things plants, artists were busy creating thousands of incredibly detailed drawings. Just look at the Marianne North Gallery at Kew Gardens in London—it’s filled with 833 paintings showing over 900 plant species, all painted between 1871 and 1885.
Let's channel some of that energy and try drawing a few more plant styles, paying close attention to their unique forms.
How to Draw a Leafy Vine
A leafy vine is one of the easiest and most satisfying things to draw. First, sketch a long, gentle S-curve across your page to act as the main stem. From there, add smaller lines branching off this main stem. Have them alternate from side to side.
For the leaves, simple little teardrop or oval shapes are perfect. Attach one to the end of each small branch, making sure to vary their angles. A little bit of randomness makes it look much more natural.
Coloring Advice: Use a dark green for the main stem and a slightly lighter shade for the leaves. For a touch of realism, add a tiny dab of yellow or light brown to the tips of one or two leaves to show a bit of natural variation.
How to Draw a Cute Succulent
Succulents are all about those chunky, geometric, overlapping shapes. Start in the center with a small, pointed oval—this is the very top leaf of your plant.
Now, draw a ring of fatter, teardrop-shaped leaves that tuck right underneath that first one. Keep adding layers, making the leaves bigger as you work your way down and out. The key is to let them overlap. Don't be shy about it! That’s what gives a succulent its full, bunched-up appearance.
Coloring Advice: Succulents often have beautiful color gradients. Try coloring the base of each leaf with a cool green and blending it into a soft purple or pink at the tips. This will give it a realistic, sun-stressed look.
For a little real-world inspiration, check out the Philodendron Pink Princess, with its striking heart-shaped leaves and pink variegation. Simply looking at photos of interesting plants is one of the best ways to get new ideas for your drawings.
How to Draw a Cheerful Daisy
A classic daisy is a fantastic way to practice creating symmetrical shapes. Begin by drawing a medium-sized circle right in the middle—this will be the fuzzy center of your flower.
Next, start adding the petals. These are just long, skinny ovals that radiate out from the center circle. Try to keep them about the same size and space them out evenly, but don't stress about perfection. Little wobbles and imperfections are what give a hand-drawn flower its charm.
Coloring Advice: Color the center with a bright yellow, then add little orange dots on top to give it a pollen-like texture. For the white petals, don't leave them blank. Use a very light grey or pale blue pencil to add a soft shadow on one side of each petal. This makes the white look brighter and more three-dimensional.
If you’re having fun with this and want to try more, we have a whole guide on how to draw a beautiful flower you might enjoy.
Bringing Your Plant Drawings to Life with Color and Shading
This is the fun part! Once you've got your outlines down, adding color is where your plant drawings really start to pop. It’s how you give them personality and make them look less like a flat cartoon and more like a real, living thing. You don't need fancy techniques to get started, either.
The easiest trick I know for adding instant depth is to use more than one shade of a color. So, instead of grabbing just one green for all your leaves, pick two—a light one and a dark one.
Think about where the sun would be shining. Use your lighter green on the parts of the leaf catching the light. Then, use the darker green for the shadowy spots, like right next to the stem or underneath where another leaf casts a shadow. Just doing that one thing makes a huge difference. This simple light-to-dark transition works with any tool, whether you're using pencils, crayons, or markers.
Simple Tips for Coloring and Blending
Every art supply has its own personality, but the basic idea of layering and blending is pretty much the same across the board. Here are some actionable tips for the most common tools.
- Colored Pencils: The secret to a smooth look is light layers. Don't press down hard right away. Instead, build up the color with gentle strokes. To blend two shades, color the lighter one first, then gently layer the darker color on top where you want the shadow. A colorless blender pencil can also work wonders here.
- Markers: Markers can be tricky because they can leave harsh lines. The key is to work fast while the ink is still a bit wet. To soften an edge, you can even use a lighter marker to "pull" the darker ink and smudge the line a bit. I always keep a scrap piece of paper handy to test how my markers will layer before I touch my actual drawing!
Shading is what gives a drawing weight and makes it look three-dimensional. Just imagine a little sun or lamp in the corner of your page. Any part of the plant facing away from that light source is going to be in shadow.
Tucking in those little shadows under leaves, along the side of a stem, or on one side of the pot is what will make your plant look like it's really sitting there. It's a foundational skill when you learn how to draw a plant that feels real. If you're ready to explore this further, our guide on shading techniques is a great next step.
Got Questions About Drawing Plants?
It’s totally normal for a few questions to pop up as you start sketching. Honestly, it's a sign you're really getting into it! Let's walk through a few common ones that artists of all ages run into.
What If I Make a Mistake?
First, don't sweat it. Mistakes are just proof you're trying something new! For pencil sketches, a good eraser is your best tool. I can't tell you how many times I've had to lighten a line or erase a whole leaf that just wasn't working. That's what sketching is all about.
Already started with markers or crayons? Sometimes you can turn a slip-up into a cool new detail. A stray line might become an interesting shadow or a bit of texture on a leaf. The trick is to pause, look at it, and see if you can turn it into a "happy accident" instead of starting over.
How Can I Make My Drawings Look More Real?
This is the big one, and it's simpler than you think. It really comes down to looking closely and adding shadows. Before you even put your pencil to paper, take a minute to really see a plant. Notice how the leaves aren't just one flat green? See how they twist and overlap?
Now, let’s add some simple shading to create that 3D look.
- Actionable Tip: Use a slightly darker color where one leaf tucks behind another. This simple shadow instantly separates the two leaves and creates depth.
- Actionable Tip: Pick a direction for your light source (even an imaginary one!) and add a curved shadow to the opposite side of the pot.
- Actionable Tip: Darken the little spot where a stem connects to a leaf. This anchors the leaf to the stem and makes it look more connected.
These little touches of light and dark are what convince our brains that a flat drawing has real depth. It's probably the single most effective trick to make your art pop off the page.
Where Can I Find Good Ideas for What to Draw Next?
Inspiration is literally all around you! Start with your own home or garden. If you don't have plants handy, a quick online search for "houseplants" or "wildflowers" will give you more ideas than you could draw in a year.
I also love to get ideas from a trip to a local botanical garden or even just the plant aisle at a hardware store. Remember, you don't have to copy something perfectly. Just use the real plants as a starting point to create your own unique drawings.
Looking for your next project? Colortada has a massive library of printable coloring pages ready to spark your creativity. Find your next masterpiece and get coloring!
