Ready to draw everyone's favorite web-slinger? Let's break down how to draw Spiderman into some really simple steps. We'll stick to basic shapes and easy-to-follow techniques, making this a perfect activity for kids and parents to tackle together.
Your Friendly Neighborhood Drawing Guide
Think of this as your very own origin story for drawing superheroes. We're going to skip all the complicated anatomy and frustrating details for now. Instead, we'll build your confidence by starting with the absolute basics.
If you want to brush up on some foundational skills, this drawing guide for beginners is a great resource, but right now, our focus is all on Spidey.
The infographic below gives you a quick visual of our game plan.
As you can see, every great drawing starts the same way: grab your supplies, sketch out some simple shapes, and then start adding in all the cool details.
Once you’ve mastered Spiderman, you can practice your new skills on our other drawing pages for even more fun.
Building a Dynamic Spider-Man Pose
Every great drawing, no matter how complex it looks, starts with a simple foundation. Before we even think about the cool details of Spidey’s suit, we need to map out his pose. This is the secret to making him look like he’s actually swinging through the city instead of just standing stiffly on the page.
Think of it as building a simple stick-figure skeleton.
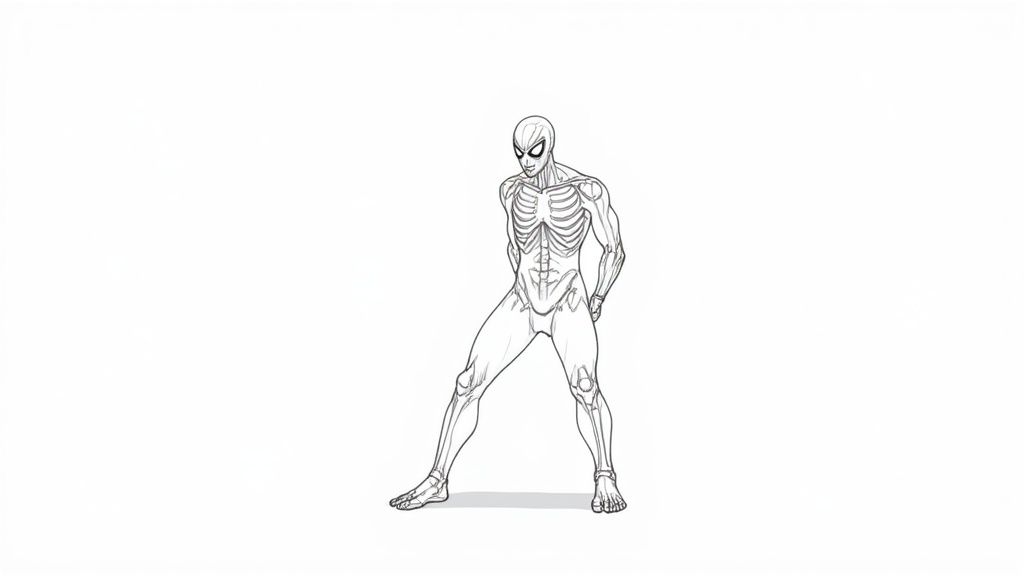
Actionable Insight: Start with an oval for the head and a larger, slightly squashed oval for his chest and torso. Then, use small circles for the joints—shoulders, elbows, hips, and knees. Connect these shapes with simple lines to form his arms and legs. For a classic web-swinging pose, try positioning the hips slightly higher than the shoulders, with one leg kicked high and the other bent underneath him. This quick sketch is what gives your drawing energy and correct proportions right from the start.
Spider-Man has some of the most iconic poses in comic book history, which makes sense when you realize The Amazing Spider-Man comics sold over 385 million copies by 2021! You can find more fascinating figures in these comic sales statistics on wordsrated.com.
If you want some extra practice, working with our leaping coloring pages is a great way to study how action poses are put together.
Bringing the Iconic Mask and Suit to Life
Once you’ve got that action-packed pose figured out, the real fun begins: drawing the famous suit. Let’s zoom in on the mask first, because getting those expressive eyes right is what truly captures his personality. A great little trick is to lightly draw a vertical line down the middle of the head and a horizontal line across it. This simple guide helps you place the eyes so they look even and symmetrical.
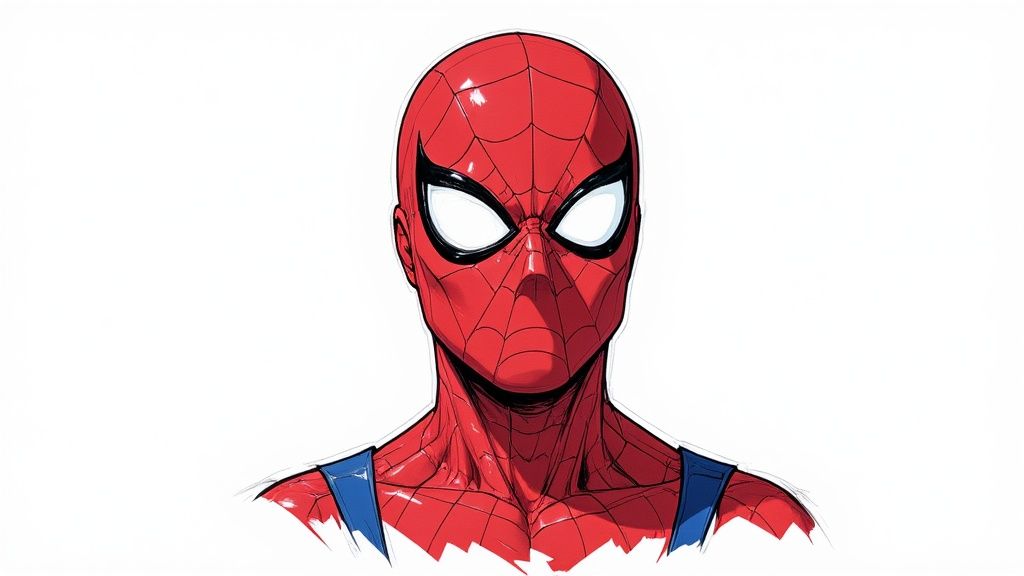
Practical Example: Draw the red parts first. This includes the mask, the upper torso and shoulders, his boots, and his gloves. Use your stick-figure foundation as a guide. For example, draw the boot line just below the "knee" circle and the glove line just above the "elbow" circle. This immediately gives your drawing a more powerful, heroic feel.
As you lay down these first lines, feel free to explore different sketching styles and see what feels most natural to you. There's no single "right" way to do it.
Getting these foundational details right is key to capturing a character with such a massive legacy. For perspective, The Amazing Spider-Man #700 sold over 200,000 copies in just its first month! When you get to coloring, a bright cherry red is perfect for the mask, chest, gloves, and boots. For the blue sections, a classic royal blue works great, but a darker navy blue can give him a more serious, modern look. If you want more practice with masks, we have a bunch of other cool mask coloring pages to try out.
Mastering the Web Pattern and Emblems
Let's tackle the part that everyone thinks is the hardest: the webbing. The web pattern is what makes Spider-Man, well, Spider-Man, but it’s actually not as tricky as it looks.
The big secret? Use the natural curves of his body—what artists call contour lines—to guide your hand. This is what makes the webbing look like it’s actually wrapping around his muscles, giving your drawing that cool, 3D pop.
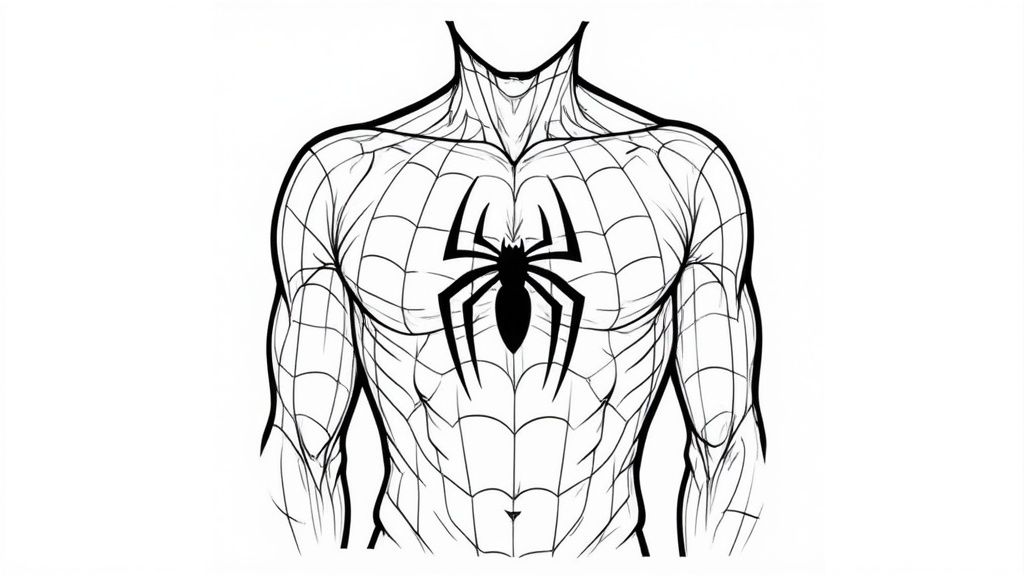
Actionable Insight: Pick a central point on his mask (usually right between the eyes) and another one in the middle of his chest for the emblem. From these spots, draw lines that radiate outward, just like the spokes on a bike wheel. Don't make them perfectly straight! Let them curve over his shoulders and chest muscles.
Once you have your "spokes," you just need to connect them. Draw gently sagging, curved lines between each spoke, and you'll see that classic web pattern come to life. Make the connecting lines closer together near the central point and farther apart as they move outwards.
Coloring Tip: When it's time to color, grab a fine-tip black marker for those webs. The crisp lines will make a huge difference. If you want to take it a step further for that professional comic book look, leave a tiny sliver of white highlight along one side of the web lines. This little trick suggests light is catching the raised webbing and really makes it stand out against the red suit.
Bringing Spider-Man to Life with Color
Now for the best part—bringing your Spidey drawing to life with color! This is where your black-and-white sketch really starts to pop off the page. Before you grab your tools, think about the vibe you're going for. A bright, classic red gives you that fun, old-school comic book feel, while a deeper crimson can make him look more like the modern, movie version.
How you apply the color depends on what you're using.
- Colored Pencils: The secret here is layering. Start with a light, even coat of red all over. Then, build up the darker reds in the shadowed spots, like under his arms or the inside of his legs. This creates a really nice sense of depth. Practical Example: Use a regular red for the base, then add a darker crimson or even a touch of brown in the shadows to make them richer.
- Markers: With markers, you want to work a bit faster. Blending colors while the ink is still wet is the key to getting those smooth, professional-looking transitions from light to dark. Practical Example: Lay down your light blue, then immediately go over the shadow areas with a darker blue marker. The wet inks will bleed into each other for a natural-looking gradient.
Coloring Advice: Imagine a single light source, like a lamp shining on your drawing from the top right. This means all your shadows should fall on the opposite side—the bottom left of every muscle and curve. For the blue parts of the suit, use black or a dark purple in the shadowed areas to add depth. For the red parts, avoid using black for shadows as it can look muddy. Instead, use a deep brown or a dark red. This one little trick makes a huge difference and instantly gives your drawing a powerful 3D effect.
It's no surprise that guides like this are so popular. Spider-Man is a global icon, with merchandise sales consistently generating over $1 billion every year. You can get a sense of just how massive his fanbase is by checking out this sales report on Bounding Into Comics.
Bringing Your Drawing to Life: Inking and Final Details
Alright, this is where the magic really happens. Moving from a pencil sketch to permanent ink is what will make your Spider-Man look like he leaped right off a comic book page. It's the step that cleans everything up and makes your drawing pop.
Choosing the right tool for the job is a big part of getting that professional look.
- For all the tiny details on his suit—especially that tricky web pattern—I always reach for a fine-liner pen. A 0.3mm or 0.5mm tip size is perfect.
- When it comes to the main outlines of his body, a brush pen is perfect for creating those dynamic, energetic lines you see in the comics.
Actionable Insight: Use thicker, bolder lines for Spidey’s overall silhouette. This simple technique makes the whole figure stand out. Then, for all the details inside—the muscles, the web lines—switch to a thinner line. This creates a fantastic sense of depth and makes the important parts of the drawing grab your attention. A great practical example is to trace the entire outer edge of his body with a thicker line, then do all the internal webbing and muscle details with your thinnest pen.
And one last thing, be patient! Let the ink dry completely before you even think about erasing the pencil lines underneath. Trust me, one rushed move can lead to a smudge that’s impossible to fix.
Hitting the Tricky Spots When Drawing Spider-Man
Even seasoned artists run into a few snags when drawing Spidey. Let's walk through some of the most common challenges and how to get past them.
Getting Those Action Poses Right
If you're just starting out, you've probably noticed that getting Spidey's proportions right in those dynamic, acrobatic poses can be a real headache. The best trick I've learned is to always, always start with a super light stick-figure skeleton. Think of it as your blueprint. This simple first step helps you lock in the correct limb lengths before you even think about adding muscles or suit details.
The Challenge of Spidey's Hands
Another classic tough spot? The hands. It’s so easy for them to end up looking like weird, lumpy claws. My go-to method is to block them in as simple mitten shapes first. Once you have that basic shape down, you can then carve out the individual fingers. It makes a world of difference.
Actionable Insight: For his classic "thwip" web-shooting hand, start with a simple square for the palm. Draw a triangle for the thumb. Then, draw two rectangles side-by-side for the two extended fingers (middle and ring finger), and two smaller, curled shapes for the other fingers tucked into the palm. This breaks a complex shape into simple, manageable parts.
Ready for more artistic fun? Colortada has hundreds of free, printable coloring pages ready to go, featuring all your favorite heroes and characters.
You can find the entire collection of free coloring pages at Colortada.com to keep the creative adventure going
