It’s a classic laundry room nightmare: a rogue crayon melts in the dryer, or your little artist leaves a colorful streak on their new shirt. Before you toss that garment in the "lost cause" pile, take a breath. Getting crayon out is surprisingly manageable, but you have to tackle it the right way.
The trick is to remember that crayons are a mix of wax and pigment. That means you're dealing with two different problems in one stain, which calls for a two-part solution. First, you'll need to deal with the waxy, greasy part, and then you’ll treat the colorful pigment left behind.
The Two-Phase Approach to Crayon Stains
Let’s be honest, just throwing a crayon-stained shirt in the wash won't cut it. In fact, hot water can melt the wax and set the pigment deeper into the fabric, making your job much harder. For example, a hot wash cycle on a shirt with a fresh green crayon mark will likely spread the waxy color into a faded green smudge across a larger area.
The secret is to handle each component of the stain separately:
- Phase 1: Lift the Wax. Your first goal is to get the waxy residue out of the fabric fibers. This usually involves carefully scraping off the excess and then using heat to melt and absorb the rest.
- Phase 2: Treat the Pigment. After the wax is gone, you'll be left with a colorful stain. This is when you bring in a good stain remover or dish soap to break down and wash away the dye.
Don't skip a step! Trying to treat the color before removing the wax is a common mistake. The wax acts like a protective barrier, preventing your stain remover from reaching the pigment underneath. It's like trying to wash a greasy pan with just cold water—the grease just repels the water.
Why This Stain is So Common
If you're dealing with a crayon mishap, you're in good company. Crayons are everywhere. The global market for wax crayons was valued at around $3.35 billion USD in 2023, which tells you just how many of these colorful sticks are in homes, schools, and backpacks around the world. It’s no wonder they end up in the laundry so often.
The methods we'll cover here are specific to crayon, but the principles are universal. Many general stain removal strategies rely on the same idea of breaking down different parts of a stain. Think of this as your specialized game plan for a very specific, and very bright, laundry headache.
For a quick overview of the process, here's a simple table breaking down what you'll need and what you'll be doing.
Crayon Removal At-A-Glance
This table summarizes the two main phases of the crayon removal process, giving you a quick reference for the tools and goals of each step.
| Phase | Objective | Key Tools Needed |
|---|---|---|
| Phase 1 | Melt & Lift Waxy Residue | Dull Knife, Paper Towels, Warm Iron |
| Phase 2 | Break Down & Remove Pigment | Dish Soap, Stain Remover, Laundry Detergent |
With these two distinct phases in mind, you're ready to gather your supplies and get that crayon out for good.
Getting Your Crayon Removal Kit Together
When you discover a crayon masterpiece on your kid's favorite shirt, there’s no need to panic or rush out for expensive specialty cleaners. The good news is you most likely have everything you need to tackle the stain right in your kitchen and laundry room.
Having these common household items on hand can turn a potential laundry disaster into a minor, manageable cleanup. Let’s walk through your crayon-fighting essentials.
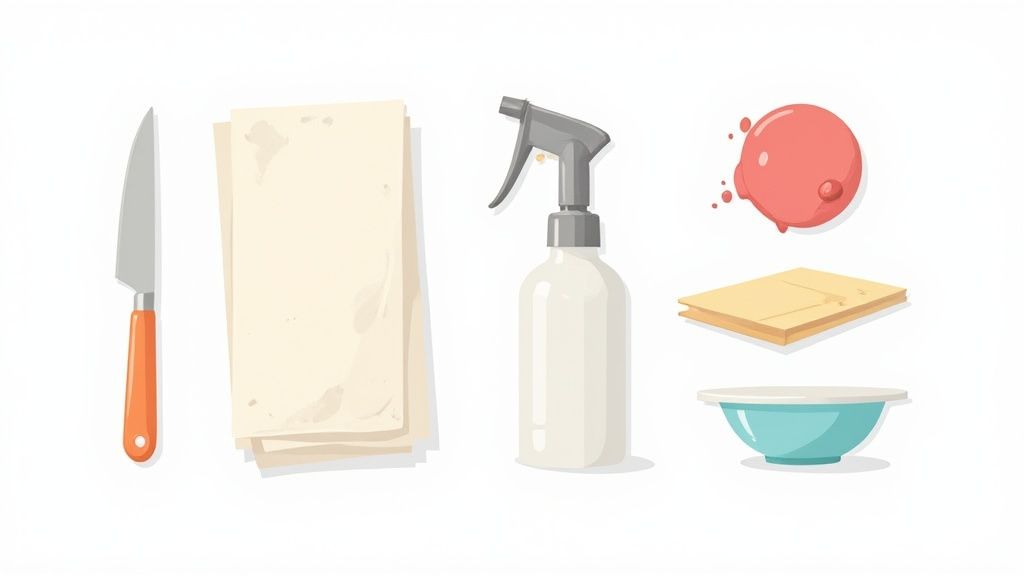
What You'll Need
A Scraper: First things first, you'll want something with a dull edge to gently lift off any surface-level crayon wax. A dull butter knife or even the edge of an old gift card works perfectly. The key here is gently scraping away the excess without grinding it further into the fabric. For instance, if you see a thick lump of red crayon, your goal is to flake it off, not smear it.
An Absorbent Material: Next up, you'll need something to soak up the melted wax. Plain white paper towels or a couple of brown paper bags are your best friends for this job. They'll act as a sponge when you apply a little heat. Just make sure they're completely plain—you don't want to accidentally transfer the ink from a printed napkin onto the clothing!
A Cleaning Agent: The final piece of the puzzle is a good cleaner. Since crayon is made of wax and pigment (an oil-based concoction), a quality grease-cutting liquid dish soap is remarkably effective. It’s designed to break down oils, making it a perfect pre-treatment for these kinds of stains. For really tough spots, your go-to laundry stain remover can also do the trick.
Pro Tip: Prevention is always easier than a cure! Setting up your little one for mess-free creativity can save you a lot of time later. A great way to do this is by choosing washable art supplies from the start. For some fantastic ideas, take a look at these recommended art supplies for two year olds that make cleanup a breeze.
Dealing with Fresh Crayon on Fabric
So you've just spotted a bright streak of crayon on a brand-new t-shirt. The key here is to act fast. Catching it while it's fresh can mean the difference between a five-minute fix and a laundry-day headache. The game plan is simple: deal with the waxy part first, then go after the color that's left behind.
First things first, get rid of any solid chunks of crayon sitting on top of the fabric. Grab a dull knife, the edge of a spoon, or even an old credit card and gently scrape away the excess. The goal is to lift the wax off, not push it deeper into the material, so use a light touch.
Using Heat to Lift the Wax
With the surface wax gone, it's time for a classic trick: the heat transfer method. This works wonders for pulling that stubborn, oily wax right out of the fabric fibers.
- Set up your workspace. Lay the stained item flat on an ironing board. Slip a few plain paper towels or a brown paper bag under the stain.
- Cover the crayon mark. Place another clean paper towel on top of the stain.
- Apply a little heat. Set your iron to a warm setting—make sure the steam is off. Press the iron onto the top paper towel for just a few seconds. You’ll see the wax melt and soak into the paper, leaving a greasy, colorful spot.
- Keep it clean. Lift the iron and move to a fresh section of the paper towel. Press again. Keep doing this until the paper towel stops absorbing any more wax from the fabric.
It's a pretty straightforward process. Crayons are just wax and pigment, which is why the stains feel greasy and won't come out with water alone. You need heat to melt the wax and a different solution for the color. This one-two punch can get rid of up to 80% of the wax residue on the first try.
Tackling the Lingering Color
After you’ve lifted out all the wax, you’ll probably still see a faint colored shadow. This is where a good grease-cutting liquid dish soap becomes your best friend.
Expert Tip: Whatever you do, don't toss a crayon-stained item in the dryer unless you are 100% positive the stain is gone. The heat will melt and set any remaining wax and pigment for good, making it virtually impossible to remove.
Work a small drop of dish soap directly into the stained area with your fingers. Gently rub the fabric together to work it in, then let it sit for about 15 minutes. For example, if you're working on a stubborn purple stain on a pair of jeans, really work the soap into the denim's weave. While fabrics differ, the core principles of stain removal are often the same. For instance, the techniques for cleaning a polyester couch share similarities with this process.
Finally, wash the item like you normally would, checking the care tag first. Before you even think about the dryer, inspect the spot while it's still wet. If you see any color, repeat the dish soap step and let it air-dry.
Dealing With a Melted Crayon Dryer Disaster
We've all been there. That sinking feeling when you open the dryer and find an entire load of laundry streaked with the vibrant, waxy ghost of a forgotten crayon. It's a huge mess, but it's not a lost cause. The key is to tackle the problem at its source: the dryer itself. You have to get that clean before you even think about the clothes, or you'll just keep contaminating future loads.
First things first, unplug the dryer. Safety first! Grab a plastic scraper or an old credit card and gently pry off any big chunks of hardened crayon from the drum. Once the big pieces are gone, grab some WD-40. Spray a little on a clean rag (never directly into the dryer) and wipe down the inside. That oily base is fantastic for breaking down the stubborn wax.
After you've dissolved the crayon residue, you'll want to clean out the WD-40. Just wipe the drum with a different cloth dampened with warm, soapy water. For a more detailed breakdown, we have a complete guide on how to get crayon out of dryer that goes into even more detail.
Now, Let's Rescue Those Clothes
With the dryer clean, you can finally turn your attention to the laundry. This isn't a simple spot treatment; the heat has basically baked the wax and dye into everything. Your best weapon here is a good, long soak.
Fill a tub or a large basin with the hottest water the fabric can safely handle—always check the care tags first.
- For whites, add a scoop of oxygen-based bleach. It's a powerhouse against stains without the harshness of chlorine bleach.
- For colors, stick with a color-safe oxygen bleach to keep your brights from fading.
Submerge all the crayon-covered clothes and let them soak for a good while. I'd recommend at least 30-60 minutes, but for really bad cases, letting them sit overnight can make all the difference. This long soak is what really gives the hot water and cleaner time to loosen the wax and lift the pigment out of the fibers.
After the soak, run the whole load through a normal wash cycle. And this next part is critical: do not put the clothes back in the dryer! The heat will permanently set any stain that's left. Instead, hang everything up to air-dry.
Once they're dry, you can inspect each piece in good light. If you still see faint marks, just repeat the soaking and washing process. Only when you are 100% certain the crayon is completely gone should you even think about using the dryer again.
The infographic below breaks down the basic steps for getting a single crayon mark out, which is the same core principle you're using for this larger disaster.
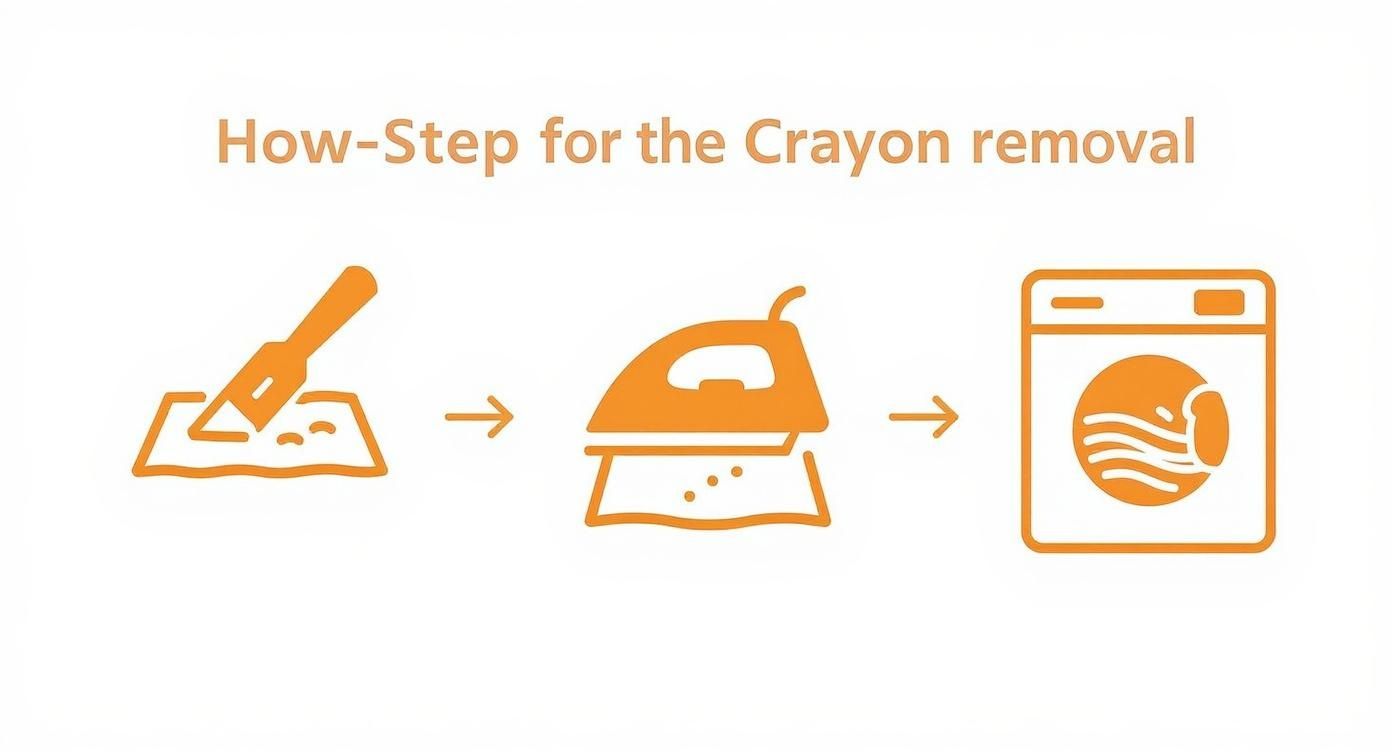
It really boils down to that fundamental scrape-heat-wash method. It works by separating the wax from the pigment, making both much easier to remove for good.
What to Do When Crayon Stains Just Won't Quit
We've all been there. You followed the steps, but a faint, colorful shadow of the crayon mark remains. This is usually the case with older stains, especially if the clothing has already been through a hot dryer cycle. That heat essentially bakes the wax and pigment deep into the fabric fibers.
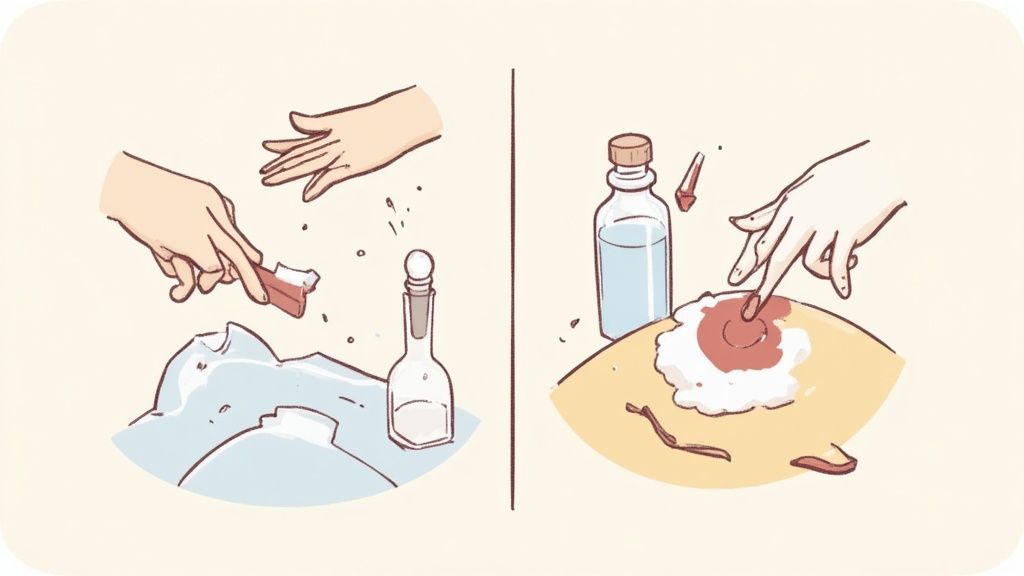
When that happens, it’s time to bring out the heavy hitters. One of the best I've found for a truly set-in stain is simple isopropyl (rubbing) alcohol. After scraping away any wax you can, just dampen a cotton ball with alcohol and start blotting. You'll see the alcohol begin to dissolve and lift the stubborn pigment that’s bonded to the fabric.
A Quick Word of Caution: Always test any solvent on a hidden spot first, like an inside seam or hem. For example, before dabbing alcohol on a bright red shirt, test it on the inside hem to ensure the shirt's red dye doesn't lift along with the crayon stain.
For Silks, Wools, and Other Delicates
You can’t exactly take a hot iron to a silk blouse or a wool sweater. Heat is the enemy of these fabrics, so we need a totally different game plan: the freezer.
- Pop the stained item into a plastic bag and stick it in the freezer for 30-45 minutes.
- The intense cold makes the crayon wax incredibly brittle.
- Once it's frozen solid, most of the wax should flake right off with a gentle scrape.
If any color is left behind, you can follow up with a gentle spot treatment using a wool-safe detergent. This trick lets you tackle the wax without risking any heat damage. And if you're dealing with other tough spots, our complete stain removal guides offer more expert advice.
The Secret Weapon for Tough Fabrics
For those really ground-in, seemingly permanent crayon marks on sturdy fabrics like denim or cotton, I have a secret weapon: a penetrating lubricant like WD-40. It might sound strange, but it's an absolute game-changer because it's designed to dissolve waxy, greasy messes.
Just give the stain a quick spray and let it work its magic for about five minutes. You'll see it start to break down the wax. After it sits, work a bit of strong, grease-fighting dish soap into the spot before tossing it in the wash. This one-two punch can knock out even the most hopeless-looking stains.
Proactive Tips for Preventing Crayon Stains
https://www.youtube.com/embed/-mkXQ3NSp38
While knowing how to get crayon out of clothes is a lifesaver, the best-case scenario is avoiding the stain altogether. A few simple habits can save you a ton of time and elbow grease, keeping laundry day from turning into a rescue mission.
The easiest first step? Create a dedicated "art uniform." This doesn't have to be anything special—an old, oversized t-shirt or a proper art smock works wonders. This not only protects their everyday clothes but also signals to your child that it’s time to get creative without worrying about a mess.
Smart Choices and Simple Habits
A little foresight when you're shopping can make a huge difference down the line. Keep an eye out for washable crayons. These are made with pigments designed to break down easily in a normal wash cycle. They aren't completely foolproof, but they are far more forgiving than traditional wax crayons.
Another habit that takes just a few seconds is the pre-laundry pocket check. Before tossing anything into the hamper, give the pockets a quick pat-down. It’s a tiny step with a massive payoff.
This single action is the most effective way to prevent the dreaded melted-crayon-in-the-dryer disaster—a scenario far more difficult to fix than a simple spot on a shirt.
By putting these simple strategies into play, you create a system that lets kids be kids while minimizing your laundry headaches. A designated art shirt, the right kind of crayons, and a quick pocket check are really all it takes to keep those colorful stains from becoming a problem.
Got Questions About Crayon Stains? I've Got Answers.
Even with the best instructions, crayon stains can throw you a curveball. They're a unique combination of wax and pigment, and every fabric seems to react differently. Let's tackle some of the most common questions I hear from parents dealing with these colorful messes.
Should I Reach for the Bleach?
My advice? Step away from the chlorine bleach. It’s a common first thought, but it’s not your friend here. Chlorine bleach is great for some stains, but it does very little to break down the oily, waxy part of a crayon mark. Worse, it’ll strip the color right out of your fabrics, leaving you with a faded splotch instead.
If you're working with whites or colorfast clothes, an oxygen-based bleach is a much smarter move. A good, long soak in hot water with some oxygen bleach can really help lift both the wax and the dye after you've scraped off the excess.
What About Vinegar?
I see this tip all over the internet, and it's... partially true. White vinegar isn't a miracle worker for the initial waxy crayon disaster. It simply can't cut through that greasy buildup on its own.
Think of vinegar as a follow-up tool. Once you've dealt with the solid wax (using an iron or a scraper), a little white vinegar applied directly to the lingering color stain can help break down that last bit of pigment. Let it sit for 20 minutes or so before you toss the item in the wash. It’s a good finishing touch, not a starting player.
How Do I Get Crayon Out of Delicate Fabrics Like Wool or Silk?
This is where you need to completely change your game plan. Heat is the enemy of delicate materials like wool and silk, so putting an iron anywhere near them is a recipe for disaster.
Instead of heat, use cold. Pop the stained garment into a plastic bag and stick it in the freezer for about 30 minutes. The cold hardens the wax and makes it brittle, so you can gently flake or scrape most of it away without harming the delicate fibers. For example, if there's a blue crayon mark on a wool sweater, freezing it will allow you to pop the solid wax off with your fingernail.
For any faint color that remains, spot-treat with extreme care. A dab of mild detergent made for delicates is your best bet. Always, always test it on an inside seam first to make sure it won’t affect the fabric's dye. It's a gentle process, but it works.
At Colortada, we think messes should be part of the fun, not the stress. When you're ready for a worry-free creative session, check out our massive library of free printable coloring pages. To encourage kids to stay within the lines, try showing them how shading with the side of the crayon can fill large areas quickly, and using the tip can create crisp edges.
You can find your child's next favorite page at https://www.colortada.com.
