Let's be honest, a My Little Pony coloring page is more than just a piece of paper and some lines. It's a portal to the magical land of Equestria, a place where friendship and fun are the most powerful forces around. This guide is your map to finding the best pages, with plenty of actionable tips and coloring advice to turn a simple printable into a real adventure for your little one.
Why Equestria Still Captures Our Hearts
For years, the colorful world of My Little Pony has been a staple of childhood, and it's not hard to see why. The show isn't just about cute ponies; it's built on powerful, positive lessons about friendship, kindness, and being brave. When kids sit down with a My Little Pony coloring page, they're not just filling in a picture—they're connecting with characters they admire and stories they love.
Whether your child relates to the bookish Twilight Sparkle or the bubbly, energetic Pinkie Pie, each pony offers a unique personality to bring to life. This isn't just coloring; it's a quiet form of storytelling where they're in charge of the crayon-and-marker narrative.
It’s More Than Just a Fun Way to Pass the Time
Giving a child a My Little Pony page is one of the best stealth-learning tools a parent has. It’s fantastic for developing fine motor skills as they carefully navigate the lines, and it’s a natural way to practice color recognition and just let their artistic side shine. The focus required can also be incredibly calming for an energetic kid.
That finished picture? It’s a trophy. It’s proof of their hard work and creativity, and you can see the pride on their faces. They get to make all the decisions: Should Rainbow Dash get a streak of sparkly purple in her mane? What color are the apples in Applejack’s orchard today? These little choices are great for building confidence and problem-solving skills.
Actionable Coloring Tip: To give a pony’s coat that extra magical shimmer, start with a very light base color, like a soft yellow or pale pink colored pencil. Then, gently add a slightly darker shade in the shadowed spots—think under the chin, below the belly, or along the back of the legs. It’s a simple trick, but it really adds depth and makes the character pop right off the page.
It’s no surprise that the franchise became a massive hit, generating over $1 billion in annual retail sales by 2014. That huge popularity meant a flood of awesome creative stuff for fans, including tons of licensed coloring books and printables. This made it easier than ever for kids everywhere to bring a piece of Equestria home. If you're curious about the history, the My Little Pony Wiki is a great place to get lost for a while.
Finding and Printing Perfect Pony Pages Safely
Hunting for the perfect My Little Pony coloring page online can feel a bit like a quest through the Everfree Forest. You want to find high-quality, safe-to-print images, but it's easy to get lost in a sea of pop-up ads and blurry downloads.
The best strategy? Start at the source. Official brand websites or trusted fan communities known for their high standards are always your safest bet.
A simple trick I've learned for better search results is to get specific. Instead of just typing "pony coloring page," try "official Rainbow Dash coloring sheet" or "printable Princess Celestia line art." More targeted searches like these often lead you straight to the good stuff—crisp, clean pages that are a joy to color.
Identifying High-Quality and Safe Sources
When you land on a website, take a quick moment to size it up. Does it look professional and well-maintained? Or is it a chaotic mess of flashing ads and sketchy-looking links? Reputable sites are usually clean, easy to navigate, and make downloading their content straightforward.
A big red flag is any site that demands you download special software or hand over personal information just for a coloring page. Steer clear of those.
Here are a few green flags to look for that tell you you're in the right place:
- Obvious Download Buttons: The "download" or "print" button should be easy to find and clearly labeled. No tricks, no hoops to jump through.
- Sharp Previews: If the images look sharp and detailed on your screen, that's a great sign they'll print well.
- Positive Community Buzz: For fan sites, a quick search for comments or social media mentions can confirm it's a trusted resource.
Getting Your Print Settings Just Right
You've found the perfect image! Now, the final step is printing it correctly to create a fantastic coloring experience. To get those crisp lines and avoid a blurry mess, it helps to understand the best photo resolution practices. For printing, a high-resolution file—ideally 300 DPI—is what you're aiming for.
When you're ready to print, dig into your printer settings and select the "High Quality" or "Best" option. Sure, it uses a bit more ink, but the difference is night and day. This simple tweak prevents the fuzzy or broken lines that can be so frustrating for little hands to color within.
The entire journey, from finding a beloved character to bringing it to life with color, is a powerful developmental process for a child. It starts with the magic of friendship they see in the show, translates into a creative outlet, and ultimately sharpens their fine motor skills.
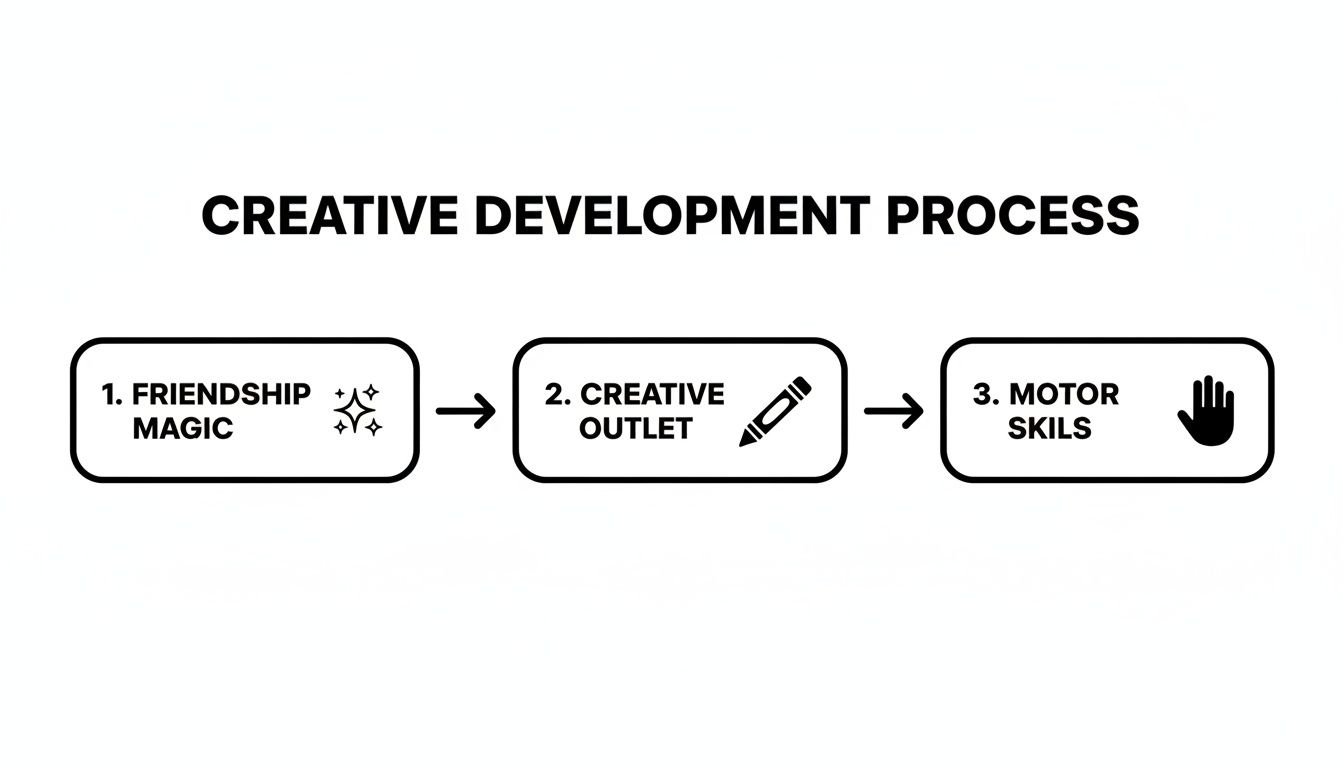
As this flowchart shows, coloring is much more than just a fun activity; it's a way for kids to connect their imagination to real-world skills.
Choosing the Right Paper for Your Coloring Project
The paper you choose can make a huge difference in the final artwork. While standard copy paper works in a pinch, picking the right type for your chosen coloring tools can elevate the entire experience.
Here’s a quick comparison to help you decide.
| Paper Type | Best For | Pros | Cons |
|---|---|---|---|
| Standard Copy Paper | Crayons, basic colored pencils | Inexpensive, readily available | Flimsy, prone to bleeding with markers |
| Cardstock | Markers, paint, heavy coloring | Durable, prevents bleed-through, feels premium | Can be too thick for some printers, more expensive |
| Matte Photo Paper | Colored pencils, gel pens | Smooth surface for blending, vibrant colors | Ink can smudge if not dry, shows erased marks |
| Mixed Media Paper | A bit of everything (pencils, markers, paint) | Versatile, textured for good grip | More costly than copy paper, can be slightly off-white |
Practical Tip: If you're using markers, always place a "bleed sheet" (an extra piece of scrap paper) underneath your coloring page. This protects your table from any ink that soaks through, which is common with standard copy paper.
For more in-depth advice on navigating your printer's settings, be sure to check out our detailed guide on how to print coloring pages. It's packed with tips to get the perfect print every single time.
Bringing Your Favorite Ponies to Life with Color
Okay, you've got a crisp, clean my little pony coloring page printed and ready to go. Now for the really fun part! This is where you can move beyond just filling in the lines and start creating something that feels like a real piece of art. With just a few simple tricks, you can make your favorite pony practically leap off the page.
It really just comes down to knowing your tools. Crayons, colored pencils, and markers all have their own personalities, and once you get a feel for them, you can bring Equestria to life in amazing detail.
Achieving That Signature Pony Sparkle
We all know My Little Pony characters have these vibrant, almost glowing coats and manes. The good news is, capturing that look is way easier than you might think. It’s all about layering colors to create depth and dimension.
A fantastic place to start is by picking two shades of the same color for a pony's coat—one light and one that's just a bit darker.
- Actionable Example (Twilight Sparkle): Start by coloring her whole coat with a very light lavender pencil using gentle, even strokes. Then, grab a slightly darker purple and add shading along the edges of her legs, under her chin, and where her mane casts a shadow. That simple two-tone approach instantly makes her look more three-dimensional.
Want an even softer, more seamless finish? Your white colored pencil is about to become your secret weapon. After you’ve laid down your colors, go over the entire area gently with the white pencil. It acts like a blending stick, smoothing out the pencil strokes and giving the pony's coat an almost airbrushed look.
Pro Coloring Tip: For Rarity’s brilliant white coat, avoid leaving it blank. Instead, color it with a very pale gray or a whisper-light blue pencil first. Then, use a white gel pen or even a white crayon pressed firmly to add bright highlights on her cheek, the curve of her back, and along her horn. It really makes her look like she’s glistening in the Equestrian sun.
Conquering Rainbow Dash's Iconic Mane
Ah, Rainbow Dash. Her multi-colored mane and tail are such a fun challenge. The key is to make those colors flow into each other without any harsh lines. This is where the magic of blending comes into play.
To do it well, start with your lightest color (yellow) and fill in its section. Next, take the next color in the rainbow (orange) and begin coloring right on top of the yellow's edge, gradually moving into the orange-only area. That little bit of overlap is what creates a beautiful, smooth transition.
- Marker Tip: If you're using markers, you have to work fast while the ink is still a bit wet. Color a small patch of yellow, then immediately bring the orange in next to it. Letting the tips of the markers touch just slightly helps the colors bleed together naturally.
- Colored Pencil Tip: With colored pencils, use light pressure and be generous with your overlap. After you've layered the orange over the yellow's edge, you can even go back with the yellow pencil and color over the orange edge to soften that transition even more.
These are foundational skills that can take your art to the next level. If you're hungry for more, our guide on essential coloring techniques is packed with other ideas to try.
Adding Textures and Magical Effects
Bringing a my little pony coloring page to life is also about thinking beyond flat color. Not everything in Equestria is perfectly smooth! A few simple textures can make your artwork so much more dynamic.
Try some of these actionable ideas on your next project:
- Fuzzy Fluttershy: For Fluttershy’s gentle look, try using cotton swabs. After coloring her yellow coat with pencils, gently rub the area with a Q-tip to blur the lines and create a soft, almost fuzzy texture.
- Sparkly Celestia: Princess Celestia’s flowing mane is just begging for some glitter. Color her mane with markers or pencils, then carefully trace over a few strands with a glitter glue pen for a truly magical, sparkling finish.
- Lush Green Grass: When coloring a background, don't just fill in the grass with a solid green. Use short, upward flicks with two or three different shades of green crayons or pencils. This creates the illusion of individual blades of grass and adds so much depth.
Creative Activities Beyond Just Coloring
A beautifully colored My Little Pony coloring page doesn't have to be the end of the fun. In fact, it can be the perfect jumping-off point for all sorts of new creative adventures that take the magic way beyond the page.
With a little imagination, that finished artwork can become a key to storytelling, crafting, and active play. Instead of just pinning it to the fridge, think of it as a reusable piece of your child's creativity. These ideas not only make the fun last longer but also help kids develop all kinds of skills, from narrative thinking to fine-motor coordination.
From Page to Puppet Show
One of the easiest and most engaging ways to breathe new life into a finished coloring page is to turn the characters into puppets. It's a simple craft that opens up a whole world of imaginative play.
Here’s a practical step-by-step guide:
- Careful Cutouts: First, help your child carefully cut out their colored Twilight Sparkle or Pinkie Pie. Leaving a small white border around the character makes the cutting process easier for little hands and results in a sturdier puppet.
- Add Support: Next, glue a popsicle stick, a strong paper straw, or even a twig from the yard to the back of the cutout.
- Set the Stage: A cardboard box tipped on its side makes an instant puppet theater. Your child can then direct their very own Equestria adventure, practicing dialogue and creating their own stories.
This is a fantastic activity for building confidence and creative thinking. It gets kids thinking about plot, character, and the all-important magic of friendship.
Crafting a Magical World
That growing pile of finished pony pages can become the building blocks for bigger, more ambitious art projects. By combining several colored sheets, you can create something truly special that celebrates all your child’s hard work.
Practical Weekend Project: Take a month's worth of colored My Little Pony pages and create a giant wall mural. Carefully cut out each pony, then glue them onto a huge piece of blue poster board. Add cotton ball clouds and a big, glittery sun. It becomes the centerpiece of their playroom for months!
Here are a few other crafting ideas to spark your imagination:
- Salt Dough Ornaments: Place a colored pony on a flattened piece of salt dough and trace around it with a butter knife. Once baked and cooled, your child can paint the ornament to match their original coloring page design.
- Greeting Cards: Fold a piece of cardstock in half and glue a neatly cut-out pony to the front. This is a wonderful way to create personalized birthday or thank-you cards for friends and family.
These activities are about more than just making something pretty; they encourage problem-solving and teach kids the satisfaction of seeing a project through from start to finish. If you're hunting for more great ideas, you can find a ton of other art projects for families to try together.
Showcasing Your Magical Pony Artwork
Once your little artist has brought their My Little Pony coloring page to life, that masterpiece deserves more than a quick magnet on the fridge. Celebrating their work isn't just about decorating; it’s a powerful way to boost their confidence and show them how much you value their creativity.
Let's move beyond the refrigerator door with these actionable ideas for turning their colorful creations into treasured keepsakes.
Create a Mini Art Gallery
One of the best ways to make a child feel like a true artist is to give them their own gallery. You don't need fancy, expensive frames to pull this off. Just grab a set of simple, matching frames from a craft store to create a clean, cohesive look.
Actionable Insight: Look for front-loading frames designed for kids' art. These often have a hinged front that opens like a cabinet, allowing you to easily swap in new masterpieces without taking the frame off the wall. This makes it simple to keep the gallery fresh and exciting.
Build a Lasting Collection
As the stack of finished pony art grows (and it will!), keeping it all in a personalized portfolio is a fantastic way to stay organized. A simple three-ring binder filled with clear sheet protectors is perfect for this. Let your child get involved in arranging their work, maybe sorting the pages by their favorite character or by the date they colored them.
This binder quickly becomes more than just storage; it’s a visual diary of their artistic journey. It's something you can flip through together for years, watching their coloring skills and unique style develop over time.
Practical Tip: Before you slide a page into the binder, jot the date and a quick note on the back. Something like, "James, age 5. Colored Rainbow Dash on our first snow day," adds a personal touch that makes the memory that much sweeter when you look back.
Share and Repurpose Their Art
Taking a digital copy of their artwork opens up a whole new world of creative possibilities. You can use the scanner on your home printer or even a good scanning app on your smartphone to capture high-quality digital images of their best work.
With these digital files, you can:
- Share with Family: Email the finished pictures to grandparents or share them in a private family group on social media. It's a simple way to keep loved ones connected to your child's creative world, no matter how far away they are.
- Create Custom Gifts: Upload the images to a print-on-demand service and turn their art into one-of-a-kind gifts. A brightly colored Pinkie Pie could become a coffee mug for Dad, or you could create a set of unique greeting cards to send to friends.
- Design Personalized Gift Tags: Around the holidays or for birthdays, print smaller versions of their artwork to use as charming, handmade gift tags. It's a special touch that makes any present feel more personal.
And if all this pony magic has you inspired to decorate, you could add other magical touches to the room, like this enchanting unicorn rainbow print. By showcasing their efforts, you're not just hanging up a picture; you're transforming a fun activity into a lasting, treasured memory.
Answering Your Top My Little Pony Coloring Questions
Even after you've found the perfect pages and prepped your printer, a few questions might pop up. That's perfectly normal! I've been helping parents and kids with coloring projects for years, and a few questions come up time and time again.
Let's tackle some of the most common ones to make sure your coloring session is all fun and no fuss.
What Are the "Right" Colors for the Main Ponies?
I'm a huge fan of creative freedom, but let's be honest—sometimes, a little artist is determined to get the colors just right. For fans of the "Mane 6," knowing the official color schemes can be a big deal.
Here’s a quick cheat sheet to help your child create an authentic-looking pony:
- Twilight Sparkle: Her body is a soft lavender, while her mane and tail are a mix of dark indigo, purple, and a pop of magenta.
- Rainbow Dash: She’s known for her bright, sky-blue coat and, of course, that iconic rainbow mane and tail featuring red, orange, yellow, green, blue, and violet.
- Pinkie Pie: True to her name, she has a vibrant, bubblegum pink coat with a darker, curlier magenta mane and tail.
- Rarity: Always elegant, Rarity has a brilliant white coat. Her mane and tail are a deep, stylishly curled purple.
- Applejack: This hardworking pony has a warm, light orange coat and a sunny blonde mane and tail, often tied back.
- Fluttershy: She has a gentle, pale yellow coat and a long, flowing mane and tail in a soft light pink.
Coloring Tip: If you don't have the exact shade, encourage your child to blend! For example, a light layer of blue followed by a light layer of red can create a nice purple for Twilight Sparkle's mane.
Oops! How Do I Fix a Coloring Mistake?
It’s bound to happen. A crayon slips, a marker bleeds, and suddenly there's a mark where it shouldn't be. Don't panic! Most common coloring slip-ups are totally fixable.
Actionable Advice: The best way to handle marker bleed-through is to prevent it by slipping a spare sheet of paper under your coloring page. For crayon smudges or a line that went astray, a simple pink eraser often does the trick by lifting the wax. If you're using colored pencils, a good quality artist's eraser is your best friend.
You can also turn a mistake into a moment of creative genius. A stray blue mark outside of Rainbow Dash? That’s not a mistake—it’s a cloud! A little smudge near Pinkie Pie? It's a stray piece of confetti from one of her parties. This is a fantastic way to teach kids about resilience and creative problem-solving. Art is about the fun of creating, not about being perfect.
Ready to gallop into your next coloring adventure? Here at Colortada, we've built a massive library of high-quality, printable coloring pages with all the ponies you know and love. Find your next masterpiece and download it for free today.
