Learning how to draw your favorite Pokémon is way more achievable than you might think. The secret? It all boils down to seeing them not as complex characters, but as a collection of simple, everyday shapes. Honestly, most Pokémon designs are built from basic circles, ovals, and triangles, which makes them a fantastic starting point for any budding artist.
Getting Your Gear and Nailing the Basic Shapes
Before you can bring Pikachu’s electrifying personality to life or nail the fiery tip of Charmander’s tail, you need to get the fundamentals down. That means gathering a few essential tools and, more importantly, training your eye to see the building blocks that make up every character.
It doesn’t matter if you're working with a trusty pencil and paper or a slick digital tablet—the core principles are exactly the same.
You don't have to break the bank to get started, either. Some of the best art comes from the simplest tools. If you're just starting out and need some recommendations, this guide to the best art supplies for kids has some great, budget-friendly ideas that work for artists of any age.
Your Pokémon Drawing Toolkit
To kick things off, here’s a quick look at the tools you'll need, whether you're going old-school or digital.
| Tool | Traditional Option | Digital Alternative | Best For |
|---|---|---|---|
| Drawing Surface | Sketchbook or plain printer paper | Drawing tablet (e.g., Wacom, Huion) or iPad | A clean canvas for your creations. |
| Sketching Tool | Graphite pencil (HB or 2B are perfect) | Stylus (e.g., Apple Pencil, S-Pen) | Laying down the foundational shapes and light lines. |
| Line Art Tool | Fine-liner pen (like a Micron) | Brush tool in software (e.g., Procreate, Krita) | Creating clean, confident final outlines. |
| Eraser | Kneaded or vinyl eraser | "Undo" command or eraser tool | Fixing mistakes without smudging your work. |
Choosing your toolkit really comes down to personal preference. Some artists love the feel of paper, while others can't live without the "undo" button. Try both and see what clicks for you!
The infographic below really drives this point home, showing how the building blocks of Pokémon art are the same no matter what tools you use.
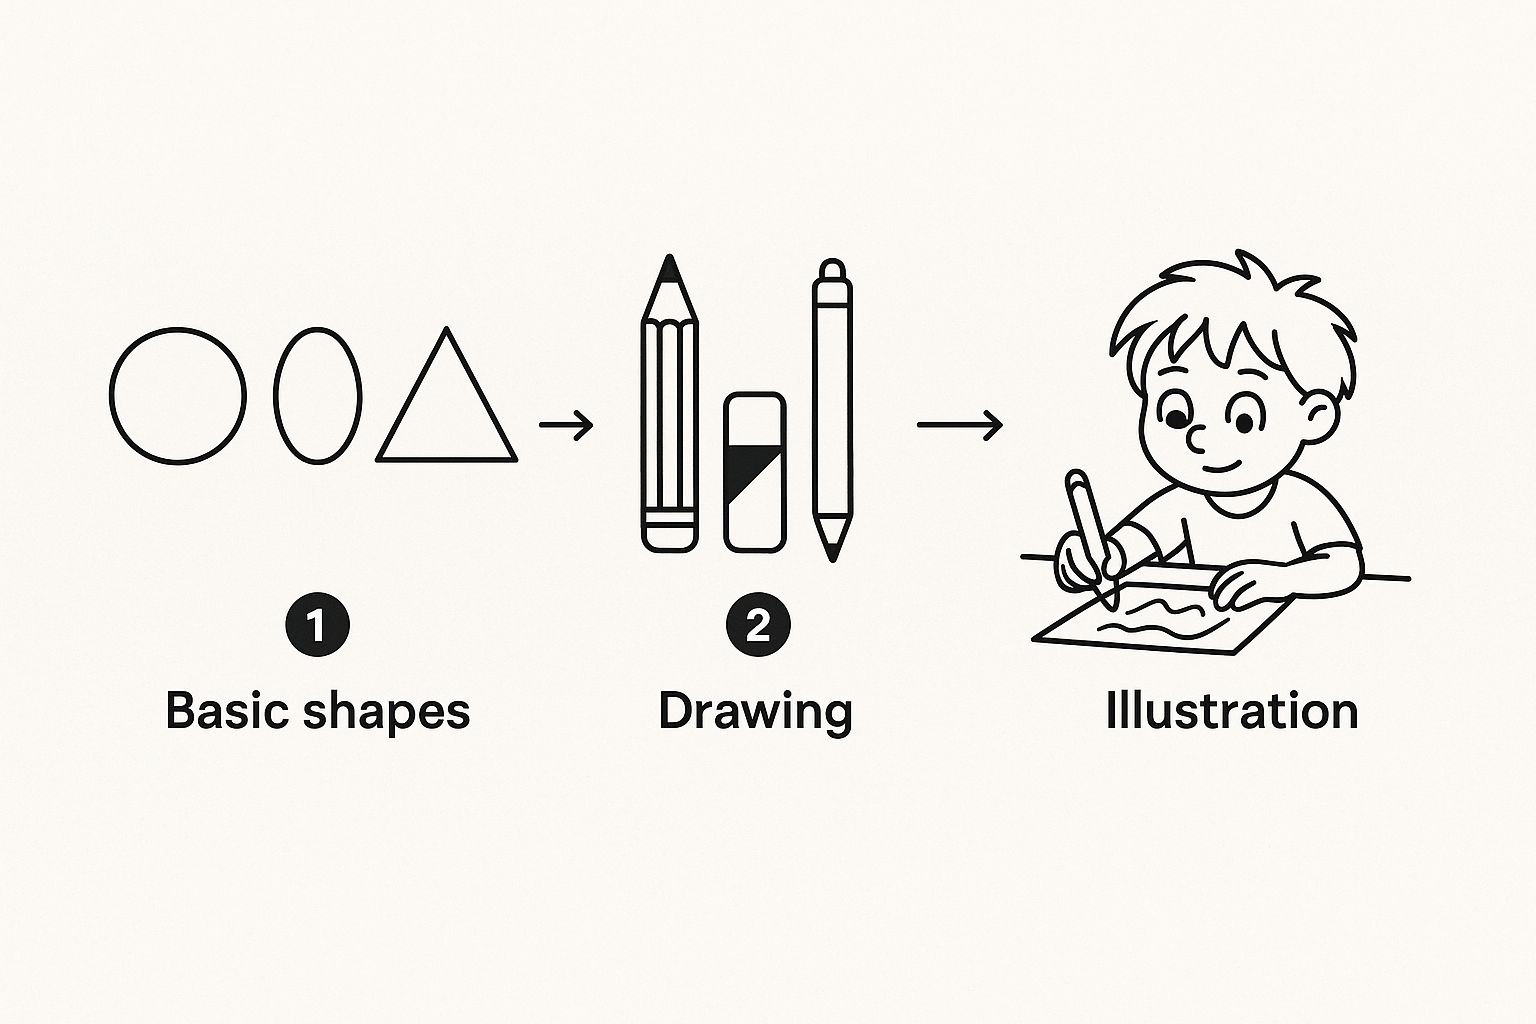
As you can see, the process always starts the same way: by breaking down what looks complicated into something simple and manageable.
Seeing the Shapes in the Pokémon
This idea of "seeing in shapes" isn't just a beginner's trick; it's a fundamental skill in character design. Think back to the very first Pokémon designs from 1996. They were created for the Game Boy, which had serious technical limitations. The designers had to use simple, bold silhouettes so players could recognize the Pokémon as tiny, pixelated sprites.
Actionable Tip: Pick a simple Pokémon to start. Look at Voltorb—it's basically just a circle with a line through it. Or Jigglypuff, which is a big circle with some little triangular ears and oval feet. Before you even put pencil to paper, just look at the character and verbally name the shapes you see. For example, say aloud, "Jigglypuff's body is a large circle, the ears are triangles, and the feet are small ovals." This little exercise is a game-changer for training your brain to simplify what you're looking at.
Deconstructing Your Favorite Pokémon
Here's a little secret that professional artists know: the key to drawing authentic-looking Pokémon isn't magic, it's a process. No animator just dives in and draws the final outline. Instead, they build the character from the inside out using what’s called a "construction sketch"—a simple skeleton made of basic shapes.
This method takes all the pressure off. It lets you nail the pose and proportions long before you commit to any final, clean lines. Honestly, it's the most important part of learning how to draw Pokémon that look like they jumped right out of the game.
Building Your Pokémon Foundation
Let's see how this works with a few fan favorites. Every Pokémon can be broken down into a primary shape that defines its body. Once you get that core shape down, everything else just falls into place.
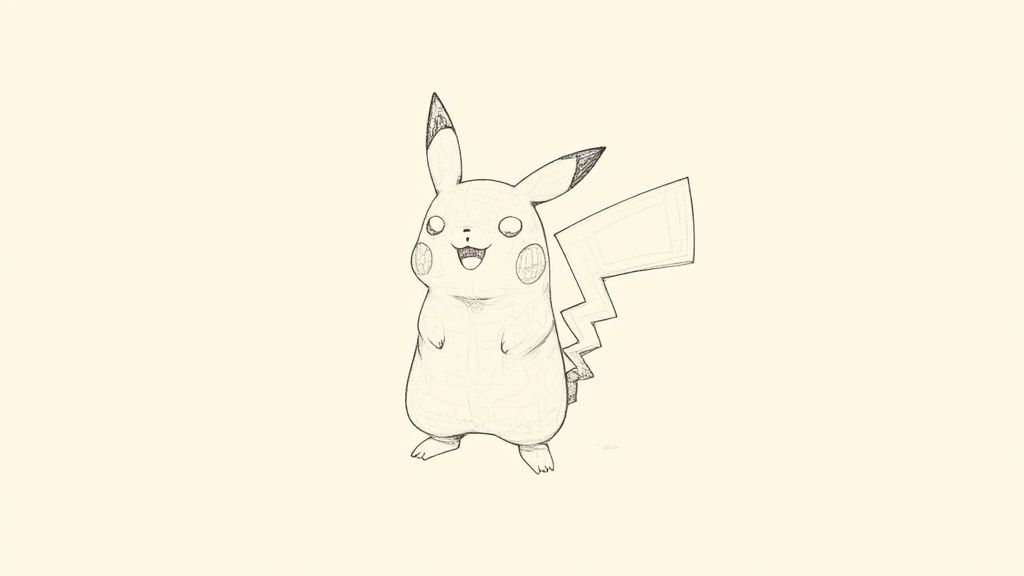
Pikachu: Start with a long oval for the body, then place a slightly smaller, squashed circle on top for the head. Add two small ovals at the bottom for feet and two thin, tube-like shapes for the arms. The iconic tail is just a series of connected rectangles that get smaller toward the tip.
Charmander: Charmander’s body is a pear shape—wider at the bottom. His head is a large circle that sits on top. His arms and legs are simple cylinders, and his tail is a long, tapering shape with a flame (like a teardrop) at the end.
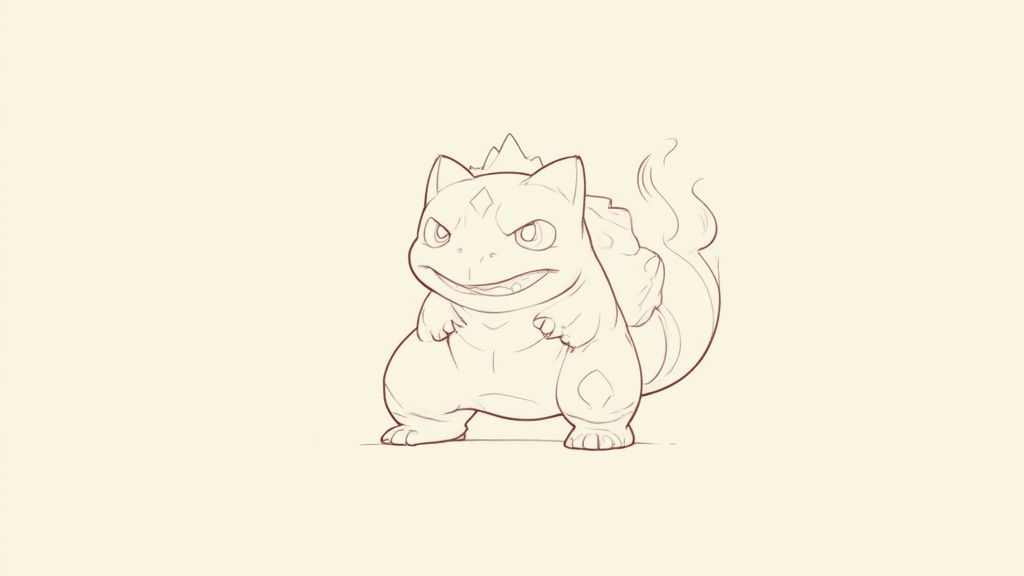
Bulbasaur: Begin with a wide, squat oval for his body. His head is more like a rounded square that connects directly to the body. That famous bulb on his back? It's just another large circle that overlaps the back of his body oval.
Starting with these simple forms guarantees that every part of the Pokémon is in the right spot and scaled correctly. It’s the best way to capture what makes each character unique. If you really want to get good at this, looking into mastering character design fundamentals is a fantastic next step.
This focus on foundational structure has been a part of Pokémon since day one. The design philosophy behind how to draw Pokémon characters has always emphasized strong silhouettes and body proportions, a core concept dating back to the 1990s. The original designers wanted every creature to have a unique and instantly recognizable profile—a principle so effective it became the entire basis for the "Who's That Pokémon?" game in the anime.
Coloring Your Construction Sketch
Believe it or not, it's helpful to think about color even at this early stage. Once you're happy with your sketch, you can start blocking in the main colors without worrying about shading or details just yet.
Actionable Coloring Tip: If you're drawing on paper, try using a light, non-photo blue pencil for your construction sketch. You can easily draw over it with graphite or ink, and it often disappears when you scan or photocopy your work, leaving your final line art perfectly clean. For all you digital artists, the trick is to put your construction sketch on its own layer and just turn down the opacity. This lets you ink on a new layer above it without any confusion.
Turning Your Sketch into Clean Line Art
Alright, your foundational shapes are mapped out. This is where the magic really starts to happen—turning that messy jumble of circles and ovals into a Pokémon you can actually recognize. This stage, often called "inking" or "line art," is easily the most satisfying part of the process.
This is where you'll draw the definitive features that make each character so iconic. That simple oval on Pikachu's backside becomes his jagged, lightning-bolt tail, and the circle on Bulbasaur's back finally gets its distinct seed pod and spots.
Adding Those Iconic Pokémon Details
Think of your construction lines as a reliable blueprint. They’ve done the hard work of figuring out proportions and placement, so now you can trace over them with confidence to create the final, clean outline.
The goal is to connect your rough shapes into one fluid form. Try to see how one body part flows into the next. Instead of just a circle sitting on a pear shape for Charmander, you'll start to define the smooth curve where his head meets his neck and flows into his shoulders.
- For Pikachu: This is when you'll add his long, black-tipped ears to the top of his head circle. Don't forget to pop in those two little circles for his signature red cheeks and sketch out his friendly smile.
- For Bulbasaur: Now's the time to draw his face inside that squarish head guide. Use the circle on his back to add the ridges and spots to his bulb, making sure it looks round and full.
This whole process of refining a sketch is a fundamental drawing skill. Honestly, the same principles apply whether you're drawing a cute monster or a superhero. We cover similar techniques in our guide on how to draw Spider-Man, where a basic stick figure is built up into a dynamic, action-packed hero.
Using Line Weight to Add Depth
Here’s a simple trick that will immediately make your drawings look more professional: line weight. It just means making some lines thicker than others to create a sense of depth and focus. It’s a subtle change, but it has a huge impact on the final result.
A great rule of thumb is to use thicker lines for the main, outer silhouette of the Pokémon. This helps the character pop from the page and feel more solid. For all the little details inside the body—like facial features, patterns, or textures—use thinner, more delicate lines.
Pro Tip: Use a thicker line for the overall outline of your Pokémon and thinner lines for internal details like eyes and patterns. For example, the outer edge of Pikachu's body and tail should be bolder, while the lines for his mouth and cheek circles should be finer. This simple contrast creates an immediate illusion of depth.
If you’re drawing digitally, this is a breeze. Most art software lets you use pen pressure, which automatically adjusts line thickness based on how hard you press your stylus. I also recommend turning on a little bit of brush stabilization—somewhere around 10-20% is a good starting point—to help you get those smooth, confident strokes without any wobble.
Working with traditional pen and paper? You can get the same effect by carefully going over your main outlines a second time or by switching to a pen with a slightly thicker nib for the silhouette.
Bringing Your Pokémon to Life with Color and Shading
https://www.youtube.com/embed/OvSgbLVTmZI
You've got your clean line art, and it's looking sharp. Now for the fun part: bringing your Pokémon off the page with color and shading. This is where a simple outline transforms into a character that feels like it could jump right out at you. It’s about more than just grabbing the right yellow for Pikachu; it's about using light to carve out their form.
The whole process starts with one simple decision: where is your light source?
Imagine a little sun hanging out in the top-right corner of your paper. Every surface on your Pokémon that faces that sun will be bright, and every part angled away will be cast in shadow. That's it. This single choice is the foundation for creating depth and making your character feel solid and real, not like a flat sticker.
Choosing Your Color Palette
First things first, let's lay down the base colors. These are the iconic, mid-tone colors that we all recognize—think Squirtle's light blue skin or Charmander's fiery orange body. Just fill in the main sections with these solid, flat colors to start.
With the base colors down, it’s time to think about shadows and highlights. Here’s a pro-tip that separates beginners from seasoned artists: don't just reach for black or gray to create shadows. That can make your colors look muddy and dull. Instead, a much better approach is to pick a darker, more saturated version of your base color.
- For Pikachu's yellow, a warm, brownish-orange makes a perfect shadow.
- For Bulbasaur's teal body, a deep forest green will add dimension without killing the color.
For highlights, you do the opposite. Choose a lighter, slightly less saturated version of your base color. Sometimes, a touch of pale yellow or pure white works perfectly for those spots where the light is hitting directly. This deliberate approach to color is what really makes Pokémon drawings pop.
To help you get started, here's a quick reference guide for a few fan favorites.
Quick Color and Shading Guide
This table gives you a starting point for the base, shadow, and highlight tones for three popular Pokémon. Feel free to experiment, but this will give you a solid foundation for creating believable depth.
| Pokémon | Base Color | Shadow Tone | Highlight Tone |
|---|---|---|---|
| Pikachu | Bright Yellow | Brownish-Orange | Pale Yellow / White |
| Charmander | Vibrant Orange | Reddish-Orange | Light Yellow |
| Bulbasaur | Teal / Light Green | Forest Green | Light Mint Green |
This framework makes choosing your palette a whole lot easier, so you can focus more on the application.
Practical Blending and Shading Techniques
Alright, let's put those colors to work. If you're drawing with colored pencils, start by applying your base color with light, even pressure. Next, gently begin layering your shadow color in the areas facing away from your light source—think under the chin, on the far side of a leg, or beneath the belly. Build up the color slowly by increasing your pressure.
To get that smooth, seamless blend, you can go over the transition between the base and shadow with a white colored pencil or a dedicated colorless blender. This simple trick polishes the gradient for a really clean finish. For those of you working digitally, a soft airbrush or a smudge tool on a low opacity setting can create that same beautiful, soft transition.
Let's Put It Into Practice: Imagine you're coloring Charmander. His base is a bright, happy orange. With your light source coming from the top right, his shadows would fall on the left side of his face, under his belly, and on the underside of his tail. You'd use a reddish-orange for those areas. To make him shine, you could add a pop of bright yellow on the top of his head and a brilliant white gleam on his tail flame to really make it glow.
This same logic applies to any character you draw. If you’re ever stuck or just need a jolt of inspiration, looking at how other artists handle color can be a huge help. You can find tons of examples by checking out these free anime coloring pages from Colortada to see professional coloring and shading in action.
Fun Practice Drills to Sharpen Your Skills
Practice is the secret sauce that turns a good artist into a great one, but it shouldn't feel like homework. The best way to build that crucial muscle memory and sharpen your eye is through fun, low-pressure exercises. These little drills help you absorb the drawing process until it becomes second nature.
Forget about tedious repetition. Let's turn your practice time into a game. These are perfect for a quick warm-up or for those days when you've only got a few minutes but still want to keep your hand in.
The Pokémon Silhouette Challenge
This first drill is a personal favorite for getting a character’s foundational shape right. The idea is simple: draw a Pokémon using only its solid outline. No eyes, no stripes, no details. This exercise forces your brain to lock onto the core shapes and proportions that make a character instantly recognizable.
- Pick a simple Pokémon: Start with someone like Snorlax or Spheal—their forms are distinct and blocky, which is great for this.
- Draw the outline only: Grab a thick marker or a dark pencil and just fill in the entire silhouette.
- Check your work: Step back and look. Does that black shape scream "Snorlax"? If not, try again, really focusing on the unique curves and angles of its form.
This simple exercise trains you to see the "big picture" before you get bogged down in the details. It's a fantastic way to improve your ability to capture a character's likeness quickly and accurately.
The Jigglypuff Expression Sheet
Okay, now let's inject some personality. The expression sheet is a classic exercise straight out of the animation world. You take one character and fill a page by drawing them with a bunch of different emotions. Jigglypuff is perfect for this—its simple, round face is basically a blank canvas for feelings.
Try to fill a page with small sketches of Jigglypuff showing at least five different emotions:
- Happy: Think big, sparkling eyes and a wide, cheerful smile.
- Angry: Furrowed brows, narrowed eyes, and that classic puffy-cheeked frown.
- Sad: Droopy ears, a downturned mouth, and maybe a single, oversized teardrop for dramatic effect.
- Surprised: Go for wide, round eyes and a small, circular mouth shaped like an "o."
- Sleepy: Half-closed eyes and a tiny, adorable yawn.
This drill is brilliant for learning how tiny tweaks to the eyes and mouth can completely transform a character's mood.
The desire to draw Pokémon has been massive ever since the games first hit the scene. The global release basically created a new wave of art styles and tutorials. By the early 2000s, "how to draw Pokémon" was already a top search term, and that trend just exploded once video platforms took off. You can find tons of tutorials online, many with millions of views, which really shows how much artists love practicing with these characters. You can get a sense of the huge popularity of Pokémon drawing tutorials on YouTube.com just by browsing for a few minutes.
Got Questions About Drawing Pokémon? I've Got Answers
Every artist, no matter how experienced, runs into a few roadblocks. It's just part of the creative process! So, let's talk through some of the most common questions I hear from people learning to draw their favorite Pokémon. Getting past these hurdles is key to keeping your momentum and confidence high.
Which Pokémon Should Beginners Avoid Drawing?
I know, I know—it's incredibly tempting to dive right in and sketch out a legendary beast. But trust me, jumping straight to Pokémon like Gyarados, Rayquaza, or Zamazenta can be a real confidence-killer for a beginner. Their twisting bodies, intricate armor, and overlapping parts are tough even for seasoned artists.
My advice? Start simple. Build your skills and confidence by mastering Pokémon that are fundamentally made of basic shapes. Think about characters like Voltorb, Diglett, or Spheal. Nailing their simple forms helps you get a solid feel for proportion and volume before you have to worry about all the complex details.
How Do I Make My Pokémon’s Facial Expressions Look Right?
The secret to great Pokémon expressions is to embrace the classic anime style: keep it simple and don't be afraid to exaggerate. You can convey a ton of emotion by just focusing on the eyes and mouth.
- Eyes are everything: A basic oval with a big white circle for a light reflection immediately brings a character to life. To show emotion, change the entire shape of the eye—a gentle downward curve for sadness, or a sharp angle for anger.
- The mouth sets the mood: You'd be surprised what you can do with a single line. A small triangle can scream surprise, while a simple wavy line is perfect for showing confusion or concern.
- Practice with the pros: One of the best exercises is to simply pause an episode of the anime and sketch the expressions you see on screen. It’s like a masterclass in emotional shorthand.
Less is almost always more with these characters. A few perfectly placed lines can communicate more feeling than a dozen over-rendered details. It’s a powerful lesson that applies to all kinds of illustration.
Once you feel comfortable drawing expressive characters, you might start thinking about bigger projects. Understanding the fundamentals of how to create a children's book is a fantastic next step to see how your art can tell a complete story.
How Can I Stop My Digital Lines from Looking So Shaky?
Ah, the dreaded shaky line—a classic struggle for anyone new to digital art. The good news is, it's totally fixable. First, dig into your brush settings and find the stabilization or smoothing feature. Cranking this up just a bit, usually somewhere between 10% and 25%, will work wonders by automatically smoothing out the little jitters from your hand.
The other big fix is more about technique. Instead of drawing with small movements from your wrist, learn to draw from your elbow and shoulder. This engages your whole arm, letting you pull longer, smoother, more confident lines. And remember, the undo button is your best friend! Don't be afraid to make a quick, bold stroke and just hit undo if it's not right. Redrawing a line a few times until it feels perfect is a standard part of the digital workflow.
Here at Colortada, we're all about fueling that creative spark. Dive into our huge library of free, printable coloring pages and keep your artistic journey moving forward. Start coloring with Colortada today!
